Pages

Saturday, June 3, 2017

Surf's Up with Emerald Creek

For this month's Emerald Creek Surf & Turf Dare, I chose to take on the surf with an under the sea Warmest Wishes card.

While it looks pretty intricate, this card was actually fairly easy to make and it comes together quickly with great results.


First, I started with a 5 1/2 x 51/2 piece of Canson XL watercolour paper and my new Tim Holtz Distress Ink Oxides in Cracked Pistachio and Broken China. I used the smooched ink on a craft sheet and spritzed with water technique, drying between layers and going back in until I was happy with the results. Next, I used the Kimilese 3 stamp and Tumbled Glass Distress ink and randomly stamped my background adding another visual layer going for a watery effect.

Then, I turned to creating the other elements. On watercolour paper, I stamped the Cerith shell with Tea Dye and the Conch shell with Dried Marigold Distress ink and heat embossed them with Fine Clear embossing powder, and fussy cut them out. Next, I used my Silhouette Cameo and cut out a small medium and large card sized version of a coral image. I coloured it with Peeled Paint Distress ink using a blending tool and then added some VersaMark ink. Once they were inked up, I covered then with Forest Foliage embossing powder and partially heat set it. Just enough to activate the emboss powder but retain some of the fussiness. Some of the powder will likely fall off, if not set enough but no worries... it just adds to the effect.

Next, I took the coral, shells, and background watery piece and played with them until I was pleased with the arrangement and knew where to place the sentiment. I stamped the Warmest Wishes and heat embossed it with Oil Rubbed embossing powder. Once, that was completed, I distressed all the edges and was ready to assemble it all.

I adhered the water background to a thick 130lb cardstock base. Using glue dots, I arranged the coral so that it was somewhat layered and loose. Next, I shaped the shells, giving them some natural contouring, and maintained it as I adhered then on top of the coral by rolling pieces of foam tape and strategically placing it under each shell. Lastly, I glued on some Citrine gemstones giving it the perfect finishing touch!

I hope I have inspired you to give this card a try. If you do, please be sure to share your results with me either in the comment section, or through IG or FB.


TTFN,


Emerald Creek products used:


Monday, May 29, 2017

She is Magic - Magenta Style Tag

I am up on the Magenta blog today letting crafty peeps know that Magenta is once again a prize sponsor for More Than Words Challenge by sharing a tag inspired by More Than Words May "She" Mini challenge .


Supplies: Bold Leaf Flourish stamp, Long Flower stamp, There is magic sentiment stamp, Flower and Leaves stencil, Raspberry Nuance powder, birdcage wood veneer, mini alpha chipboard letters (Magenta), kraft tag, texture paste, Jet Archival ink, Tim Holtz Cracked Pistachio Distress Oxide, Tim Holtz Black Soot Distress paint(Ranger), glass bead gel (Golden), VersaMark (Tsukineko), clear fine emboss powder (Simon Says Stamp), XL watercolour paper (Canson), wht cardstock (Canadian Scrapbooker Super Stock), vellum (The Paper Company), jewels (Dollarama), trim (CTMH), chain (misc.)


I started with a kraft tag and stamped the Bold Leaf Flourish stamp using Cracked Pistachio Distress Oxide ink. Next, I inked the edges and wet the ink to activate it. Once dry, I used Glass Bead gel and the Flowers and Leaves stencil. While that was drying, I stamped the Tall Blossom flower image onto 140 lb watercolour paper and heat embossed it with clear embossing powder and then watercoloured painted the flowers using Raspberry Nuance powderOnce the flowers were dry, I fussy cut them all out.


Then, I stamped the "is magic" part of the sentiment on vellum using black archival ink and painted the mini chipboard letters with black. With all the pieces ready, I assembled the tag adding on the wood veneer birdcage and an upcycled metal chain from a clothing tag.


There is magic all around us
07.807.I

CB638 - Mini Alphabet
CB638

KDL20 - Birds & Cages
KDL20

And there you have it! One last look on a different background.


Be sure to check out the challenge details and prizes here:


TTFN,


Sunday, May 21, 2017

Fast Foiled Magenta Card

Creating a fast gold leaf foiled card is a snap with a background stencil and a sentiment stamp.


Simply place a background stencil down, in this case I used the Magenta Triangles one, on a piece of thick cardstock and stamp with a VersaMark ink pad. Next, add an adhesive emboss powder and heat just until it begins to melt. Place gold leaf foil on top and rub off loose foil. Adhere to a card base. Then, white heat emboss stamp a sentiment on black cardstock, cut to size, and use foam tape to adhere it to the centre of the card. 

Magenta products used:

There you have it... elegant, fast and simple!

Another way to get a gorgeous gold effect in very little time is with glitter embossing powder as in this card.


For this one, once I stamped the VersaMark ink pad through the stencil, I covered it with Emerald Creek's Gold Sparkle embossing powder and heat set it. I cut the brush script sentiment with my Silhouette Cameo and that was another card done. Such a perfect card for an upcoming graduate!

TTFN,


Sunday, May 14, 2017

Happy Mother's Day!

In honour of this special day, I created not one but two cards using both the negative and positive Silhouette cut pieces of a stamped, heat embossed and Nuance watercoloured floral background panel.


First up, the piece that was my main inspiration... the negative background piece card... whereby the cut out part of the panel is raised with foam tape and in shadow to stand out as the focal point. 


Supplies: watercolour paper (Ranger), Floral Background stamp, sentiment stamp, Nuance powders [Hot Pink, Wisteria, Grass Green, Aquamarine] (Magenta), white cardstock (CTMH), black cardstock (Bazzill), VersaMark ink (Tsukineko), clear and white fine emboss powders (Simon Says Stamp), green glitter glue (Hampton Arts), Berlin Sans FB Demi font cut with Silhouette Cameo


I started with 4 1/4" x 5 1/2" Ranger watercolour paper because it has the whiteness that I wanted for this project. I stamped the Magenta Floral Background stamp with VersaMark using my MISTI tool so that I could stamp the image multiple times to accommodate the paper's patterned texture. It took three stampings to get this crisp clear image but it is so worth it. Next, I covered it with Simon Says Stamp Fine Clear embossing powder and heat set it. I watercoloured the image with Hot Pink, Wisteria, Grass Green and Aquamarine Nuance powders. Once dry, I trimmed the panel to neaten the edges and cut out "MOM" using a Berlin Sans FB Demi font with my Silhouette Cameo. Then, I adhered it with foam tape to a white card base to create the shadowed area. I stamped the You Are Awesome part of the Magenta stamp onto black cardstock by masking that area when loading it with VersaMark ink and then heat embossing with Simon Says Stamp Fine White embossing powder. I trimmed it and foam taped it on to add another dimensional layer. To finish this card off, I added just a light touch of green glitter glue to the already coloured green watercoloured flower centres.


Next, I couldn't resist using the positive cut floral MOM letters to create a second card. I opted to go with a more square shape as it worked with the stencil design.


Supplies: Floral Background stamp, Floral Pattern stencil, sentiment stamp, Nuance powders [Hot Pink, Wisteria, Grass Green, Aquamarine] (Magenta), white cardstock (CTMH), watercolour paper, Tim Holtz Rocky Candy Distress Stickles, Rock Candy glitter, black fine emboss powder (Ranger), vellum (The Paper Company), VersaMark ink (Tsukineko), black baker's twine (The Twinery), Berlin Sans FB Demi font cut with Silhouette Cameo


As I am in the midst of participating in the Online Card Classes' Sparkle & Shine class, I just had to use some sparkle. Inspired by Day 3 liquid accents inspiration, I used Tim Holtz Rock Candy Distress Stickles through a Magenta Floral Pattern stencil on a white cardstock card base and then coated it in more Rock Candy loose glitter for even greater sparkle and dimension. While it was drying, I again masked stamped the "You Are Awesome" part of the Magenta stamp but this time on vellum and heat embossed it with Ranger Fine Black embossing powder. Once the stenciled glitter area was dry, I assembled the card using the positive letters from the watercoloured panel, the trimmed vellum sentiment and added a some black baker's twine to tie it all together [pun intended :) ].


One of the neat things about using the positive and negative images, is that it gives you two different looking cards... especially great if you need more than one in your family... or the second can double as a birthday or thank you card for mom simply by changing the sentiment on the inside.

Wishing you a wonderful day full of family love.

TTFN,


Saturday, May 13, 2017

Little Wonder

Dream a little dream of magical lands and little wonders. For this month's Emerald Creek Dare challenge inspiration, I went with a wee wonder... a whimsical little fairy in a sparkly magical land in the form of an ATC.


To create the background, I started with a Wild Whisper Holiday Style Collection card and cut it to ATC size. I redrew the foliage with a VersaMark marker and then heat embossed it with Midnight Black embossing powder. Next, I splattered some water onto the card and sprinkled some Silver Sparkle embossing powder which adhered to the water sections and some of the embossed areas and heat set it. For the next layer, I added a previously Cracked Pistachio coloured leftover die cut, covered it with Emboss It ink, and heat embossed it with Iridescent embossing powderThen, I stamped the flower fairy Sylphie onto vellum with Archival ink. One of the great things about using vellum is that it makes reversing stamped images a snap. I coloured the back side of the image in the direction that I chose to fit my design. The flower and leaves were coloured with TomBow markers and the fairy with watercolour pencil crayons. Next, I filled in some sections of the fairy's dress with the VersaMark marker on the front side and heat embossed with Lavender Sparkle embossing powder. I repeated the same process with the hair using Vegas Gold embossing powder and then fussy cut the image. After adhering that layer, I added a touch of black glitter glue to the flower centre and created the sentiment with a label maker. All in all it makes for an enchanted detailed ATC.

Pop by the Emerald Creek Dares blog here to see other inspirational pieces by my fellow Dare-mates and to get further details on how to enter the challenge for a chance to win a $50 gift certificate.


TTFN,

Saturday, April 22, 2017

Life was Meant for a Great Adventure

Today, I am sharing an art journal page that is my eighth installment for Rae Messigman's Art Marks 30 Day Challenge from my hand made 20 page art journal. In creating this vintagey mixed media page, I was inspired by the challenges at A Vintage JourneyCanvas Corp Brands, and Simon Says Stamp Monday Challenge Blog. I love the challenge of taking on multiple challenges and making them work together.


Supplies: XL 140 lb cold press watercolour paper (Canson), Coffee Shop, Tattered Leather and Peacock Chalkboard Glimmer Mists (Tattered Angels), feather stamp (Magenta), Tim Holtz Antique Linen and Vintage Photo Distress Ink, Vintage Photo Distress Oxide ink, Coffee Archival ink (Ranger), Tim Holtz Idea-ology Small Talk sticker(Advantus), notebook border punch (EK Success), gesso (liquitex), old book page, muslin, coffee filter and brown thread (Misc.)


For Rae's prompt of One, I used one of each elemental substrate piece. A Vintage Journey's challenge is The Magic of Three so I incorporated three vertical rectangular shapes (old book print text, muslin, and a Tim Holtz's Ideology sticker) in a cluster and for Canvas Corp Brands April Challenge of Feathers, I stamped a Magenta Feather stamp with Coffee Archival ink on a coffee filter, fuzzy cut it out, and spritzed it with Tattered Angel's Coffee Shop Glimmer Mist. Then, there is Simon Says Stamp Monday Splash It On Challenge. For that one, there was a whole lot of water going on with the various stages and pieces of this piece: water on the watercolour paper background with the first layer of Vintage Photo Distress Oxide ink along with two areas of watered Peacock Chalkboard Glimmer Mist, water on the muslin to move and blend the Distress ink colours, water on the book print paper with Distress inks to age it and crinkle it, water on the coffee filter feather to distribute the glimmer mist colour, and water with gesso to create depth of colour to the Peacock Chalkboard Glimmer misted egg.

Additional touches to the page include: using a notebook border punch on the piece of old book page, Tattered Leather Glimmer Mist outline edging on the egg and splatters to both it and on the background along with splatters of Vintage Photo Distress Ink on the background, and hand stitching the muslin to the piece of old book page.

Check out the various site's by clicking on the corresponding image to get more details on their challenge and some amazing inspirational eye candy. 


  TTFN,


Monday, April 10, 2017

Doodled heART Journal Page


I made five mini 3" x 4" 20 page art journals using 90 lb cold press watercolour paper, old book pages, burlap, and 140 lb cold press watercolour paper and stitched with waxed floss. I have joined in Rae Missigman's Art Marks 30 Day Challenge Part 2 and the 100 Day Project. I have been sharing each day's journal page here on my Instagram account. For Day four, I went with the doodled hearts prompt for this month's Scrapki-Wyzwaniowo challenge and Rae's arrow prompt and came up with this page.


Supplies: tissue paper (misc.), stamps (CTMH), black Archival ink (Ranger), white and clear gesso(Liquitex), Cherry Red, Snow White, Chocolate Brown, Black Licorice gelatos (Faber-Castell), chevron arrow stencil (Art-C), graphite and black Marks All (Stabilo), Tim Holtz Ideology Small Talk sticker(Advantus), Vision Fine Black Pen (Uni-ball)


First, I collaged stamped tissue paper pieces to the old book print page and then gave it a light wash with white gesso to send it into the background. Next, I added a light coating of clear gesso to add tooth for receiving water soluble media. Once dry, I doodled the heart with gelatos using Cherry Red, Snow White, Chocolate Brown and Licorice Black and a black Stabilo Marks All which I activated it watercolour properties with a water brush for the arrow. Using a small Art-C chevron arrow stencil and with a waterbrush, I coloured a few arrows with red gelato and then traced the arrows with a graphite Stabilo Marks All. Lastly, I finished it off with a Tim Holtz Ideaology Small Talk sticker and hand printed the ART part of heart to emphasis it and give it a double meaning. 

Head on over to the Scrapki-Wyzwaniowo challenge site to get their challenge details and see their design team's inspirational creations as well as other participants' pieces.


TTFN,


Monday, April 3, 2017

Flying By

When I was in the process of creating my Life is Beautiful layout, I experimented with different embossing powder colours and Magenta Nuance colours. I turned those experimentations into the trio of cards that I am sharing with you today inspired by the Simon Says Stamp Monday Challenge - Things with Wings.


All the cards have the same basic components:
- a heat embossed Script and Postmark stamped Nuance powder wet-on-wet watercolour background on Canon XL 140 lb cold press watercolour paper with splatters
- my favourite Magenta butterfly stamp image heat embossed on a coffee filter, coloured with Nuance powder, and fussy cut out
- Magenta Leaves of Joy stamped with black Archival ink on vellum and fussy cut out
- a Simon Says Stamp wafer thin Painted sentiment die (Hello or Thanks) cut from cardstock

Here is a look at each card individually.

For this one, I flipped the leaves to the reverse side. That is one of the great things about stamping with black on vellum, you can use either the original or mirror image and it still shows through beautifully. I added a touch of black Stickles to the Painted Thanks to add a bit more sparkle to go with the butterfly.


Supplies: XL watercolour paper(Canson), Wisteria and Grey Nuance powders, Butterfly, Leaves and Script stamps (Magenta), Fine White Emboss Powder and Painted Thanks die (Simon Says Stamp), Silver Sparkle emboss powder (Emerald Creek Craft Supplies), VersaMark ink (Tsukineko), Black Archival ink and Black Stickles (Ranger), black cardstock (Bazzill), Vellum (The Paper Company)


I went for a more monochromatic feel for this one as the background and the butterfly are the same Wisteria Nuance colour. I doubled up the leaves placing them in opposite directions. I also shadow layered the Painted Hello die cut to make it pop a bit more.


Supplies: XL watercolour paper(Canson), Lavender Nuance powder, Butterfly, leaves and Script stamps (Magenta), Fine White Emboss Powder and Painted Hello die (Simon Says Stamp), Silver Sparkle emboss powder (Emerald Creek Craft Supplies), VersaMark ink (Tsukineko), Black Archival ink(Ranger), black cardstock (Bazzill), white cardstock(CTMH), Vellum(The Paper Company)


The final one has a Purple Nuance coloured background over fine silver embossing. I keep the coffee filter butterfly unpainted and popped it slightly with foam tape to get it a bit above the leaves.


Supplies: XL watercolour paper(Canson), Purple Nuance powder, Butterfly, leaves and Script stamps (Magenta), Painted Hello die (Simon Says Stamp), Silver Sparkle emboss powder (Emerald Creek Craft Supplies), silver emboss powder (CTMH), VersaMark ink (Tsukineko), Black Archival ink(Ranger), black cardstock (Bazzill), Vellum(The Paper Company)


Hop on over to the Simon Says Stamp Monday challenge blog for more inspiring Things With Wings.


TTFN,


Saturday, April 1, 2017

Double Duty Dare

This month's Emerald Creek Dare starts today with a theme of Double Duty.  It is all about projects that can have multiple meanings. As a stamp collector, I am always looking for ways to get more out of my stamps. For my Dare inspiration up on the Emerald Creek blog, I featured a card with an image and sentiment that can get double, triple and even quadruple duty by utilizing a variety of different inside sentiments allowing the cards to be personalized at a moment's notice.


The inside sentiment can be for a 'thinking of you' type card with a sentiment like... "you have a great day!" .... or a birthday sentiment like... "your day is as special as you!"... or a 'get well soon' type sentiment like... "you are better soon!".

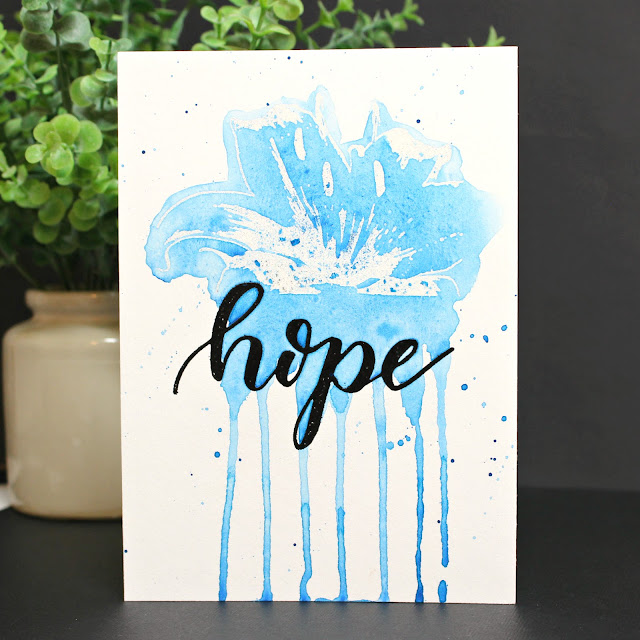
To create this card, I started with Ranger watercolour paper, stamped the Tiger Lily image and heat embossed it with Fine Clear embossing powder. Then, I heat embossed the Kelly Creates script Hope with Gold Sparkle emboss powder. Next, came watercolour painting. I used #50 Pale Aqua Kuritake Gansai Tambi watercolour paint but you can use your watercolour media of choice be it watercolour pencil crayons or pastels, Nuance powders, Distress Inks or gelatos. To finish it off, I added a few Simon Says Stamp Assorted Moonshine Sequins.

Furthering my take on the Double Duty theme, here are some other variations using the same two stamp images but different colours and designs giving you different looks and feel.


On this messy artsy style one, I went with Iridescent Shimmer and Midnight black embossing powders on 140 lb Canson XL watercolour paper. I painted with Gansai Tambi #62 Cobalt Blue and tipped the card to allow the paint to run down.


For this one, I used Vegas Gold and Midnight Black embossing powder on Canson XL watercolour paper. I painted the Lily with Gansai Tambi #33 Orange and #32 Red and splattered with #33 Orange and #20 Black. I added EC Quarry Moissanite Mixed Media Stones for stamen and drew in the stems with pencil.


On this last one, I used Fine Clear and Midnight Black embossing powder on Strathmore 400 series 140 lb cold press watercolour paper. I painted the Lily with Gansai Tambi #37 Deep Pink and painted the free form stem and leaves with #53 Mid Green as well as splattering with both colours. Once dry, I added an assortment of the Assorted Moonshine sequins.

I am really excited about this month's Dare and to see how it inspires people with their interpretation of double duty. Enter the Emerald Creek Double Duty Dare for a chance to win a $50 gift certificate. Discount codes and details can be found here.


TTFN,


Emerald Creek Products used:

Thursday, March 30, 2017

Aries Galaxy Card

I really do love it when my teenage daughter requests custom cards for her friends. It tells me not only that she likes my artwork but also that she deems it cool enough to share with her peers. In the latest instance, she asked me to make a birthday card for her best friend. She wanted to know if I could make it a galaxy one like my eclipse ATC and could I put the Aries constellation on it. I showed her another galaxy card that I had created for Queen of the Crop retreat Make'n Take and it was along the lines of what she wanted.


I used Canson XL 140 lb watercolour paper and lightly drew the constellation and Aries word with a yellow pencil first. Then, I used a fine brush and covered the pencil lines with masking fluid. Next, I used my Kuretake Gansai Tambi paints using a wet on wet technique to paint the galaxy. Once dry, I rubbed off the masking fluid and matted it on black cardstock. I am happy to say that my daughter was thrilled with the results.

This is my colouring for Day 30 of the 30 Day Coloring Challenge and I am entering this card in this week's Simon Says Stamp Anything Goes Wednesday Challenge.


TTFN,