Pages

Wednesday, August 13, 2014

Magenta Watercolour Cards

Today, I am sharing these two cards over on the Magenta blog that were created using watercolour techniques.

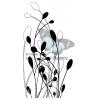
For the first card, I used two colours of distress ink to load the Doodle Flower stamp.  A few spritzes of water onto the stamp prior to stamping onto the watercolour paper and then a quick spreading of the ink from the edges to the centres using a water brush. It creates a softer image that actually looks hand painted.


For the background, I stamped onto a craft sheet (you can use any non-porous surface) with a distress ink pad and then using a water brush, I painted; filling in my precut piece of watercolour paper around the flower image.  After it dried, I placed the stamp backing paper over my flower image as a mask and splattered water on the background.  The distress ink reacts with the water and creates a cool mottled effect.

I mounted my piece onto my card base.  Then, I stamped the Think Happy Thoughts onto white cardstock, cut the sentiment into two sections, and popped them up on the card.


For the next card, I used a similar stamping technique by loading my stamp with distress ink and spritzing it with water prior to stamping. 


The difference was that I only loaded parts of the Tranquil Buds stamp so that I could create my garden around my fence.  The fence is an embossed diecut, painted with watercolour paints, and then I used masking fluid over it to be able to stamp my scene and have it appear behind.  

Using the same stamp off onto a non-porous surface technique mentioned above, I coloured using my water brush to fill in the base of my garden and create grass.  I then used yellow watercolour paint to fill in sections of the stamped image.  After adhering it to my card base, I stamped the... oh so pretty... "Thanks for Everything you do" sentiment stamp, and added a few flower sequins.

TTFN,


Sunday, August 10, 2014

Took it Off the Rails with Pop & Colour

I really liked the colours and images along with the sketch over at Off the Rails Scrapbooking this month. Paired with some new learning... I am taking the Pop & Colours #3 course... this is what I created...


Supplies: cardstock (Canadian Scrapbooker Super Stock), gesso (Golden), stencil (The Crafter's Workshop), gelatos and black Stamper's Big Brush (Faber-Castell), Glimmer Mist and Glimmer Glaze (Tattered Angels), patterned paper (Webster's Pages), script print canvas (Pink Paislee), stamps (Unity Stamps), foam and fabric letters (American Crafts), ink, Tim Holtz Distress paint and gel medium (Ranger), pens (Zig and Sharpie), glass beads, trim and organza fabric (Dollarama)

I used many of the techniques taught by Riikka Kovasin in the first lesson. I used up scraps of die cuts which was great but they were mostly paper ones. Next time I would use all cardstock or chipboard ones for the base background process.


Check out this fabulously inspirational moodboard and sketch:


I was liking the texture of that first inspiration photo and then the beaded waistband in the second so I wanted to incorporate them both in the layout hence the fuzzy trim and the beads.


Definitely stretching my comfort zone with this one which is a good thing. My daughter and her friend think it is kickin' so that makes it worth it in of itself.

TTFN,


Friday, August 8, 2014

My Favourite Magenta Stamp

Have you ever had a stamp that you can use in more than one way? I have just such a stamp which was my natural choice for my August's My Favourite Magenta Stamp challenge project.  Funnily enough, the 3 Butterflies in a Frame stamp was the very first Magenta stamp I ever owed years ago and I still love it!


Supplies: stamp, stencils, patterned paper, corrugated leaves, mesh (Magenta), cardstock (Canadian Scrapbooker Super Stock), clear gesso (Liquitex), gelatos (Raspberry, Metallic Silver, Metallic Mint, Acqua Dolce, Cotton Candy) and Stamper's big Brush black (Faber- Castell), Tim Holtz Distress paint (Pewter and Soot), multi medium matte, and Archival ink (Ranger), glass bead gel (Golden), silver emboss powder, pen and clear bitty jewels (CTMH), black jewels and vellum (Dollarama), glittered foam and chipboard letters (American Crafts), glitter letter stickers (Making Memories), light canvas fabric (Misc.)


Lots of different techniques going on in this layout:

- Achieved the distressed paper look using a paper transfer technique
- Added colour with a variety of gelatos, and I used them with flower stencils and glass bead gel to create the flowers (watch for a future tutorial on these beauties)  


- and I used my favourite stamp three different ways:

I used the stamp as-is at the bottom and the top of the page and then with fussy cutting the butterflies after stamping them onto vellum...


and thirdly, I used the outside border with heat emboss powder to create a frame for my photos.


So go grab your favourite Magenta stamp and come play along with us this month for a chance to win this gorgeous prize.


For colour, I was totally inspired by the gorgeous August Moodboard created by Chantalle McDaniel over at Sassy Scrappers and joined in their fun.


Isn't that board so irresistibly scrumptious?!


TTFN,


Tuesday, August 5, 2014

Keep it Simple

I am up on the Magenta blog today with this little jem. 


Supplies: stencil and stamp (Magenta), gesso (Golden), whipped spackle and gelatos (Faber-Castell), gel medium and Archival Ink (Ranger), pen (Sharpie), chipboard base and cardstock scrap (misc.)


A little reminder to myself. Sometimes I need it.


Loving the newest release. This was the first thing I made the day my DT package arrived. I couldn't wait to play with the stencil and of course whipped spackle and gelatos. Really do love what I can do with them all so easily.

Hope you have a simply wonderful creative day!


TTFN,