Pages

Sunday, December 30, 2018

Many Thanks!


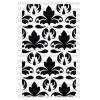
As the year comes to an end, it is time to reflect and give thanks for the many blessings of the year. Today, I am up on the Magenta blog sharing many thanks with this bevy of watercoloured Thank You cards.


This card design is colourful, bold and bright and simple to make. Start by cutting a piece of 140 lb watercolour paper and fold to make a 4 1/4 x 5 inch card. Using a wet-in-wet watercolour technique, wet the centre of the card with clean water and then drop in your desired colours. Let the water work its magic as it dries moving and blending the colours. Once dry, place a stencil over top ( here I used two of the Geometric TrioFloral PatternDamask Background, centre circles from the Background Trio, and Morrocan) and using a baby wipe, lift some of the colour away through the stencil.


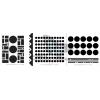
Once dry, stamp the awesome card sized Thank You! into the centre with black Archival ink. Using a stamp positioner, like the Misti, is invaluable for this as you will have to stamp multiple times to get a clean fully filled impression as the watercolour paper is textured and easily sops up ink. Lastly, a little black paint splatter and the cards are complete!


Supplies: Thank You stamp and stencils (Magenta), XL 140 lb watercolour paper (Canson), Mission Gold watercolours (Mijello), Tim Holtz Black Soot Archival ink (Ranger), black acrylic paint (DecoArt)


Wishing you and yours health, happiness and all the best in the New Year!

TTFN,

*****

Magenta products used:

Thursday, November 29, 2018

Merry & Bright


Hello crafty friend! Today, I am up on the Magenta blog with a card that is ideal for quick mass production as a Christmas card.


I really love the icy effect created with the iridecent embossing powder on the kraft carstock. A simple how-to can be found ont the Magenta blog here

*****

Magenta products used:


Hope you give this simple design a try.

TTFN,


Saturday, September 29, 2018

Rosa Canina Duo Watercolour Card


When I saw the Rosa Canina Duo stencil in the new collection, it just begged to be used with watercolours. Today, I am up on the Magenta blog sharing a watercolour technique used in the making of this card.


I started with a 4 1/4 x 5 1/2" card base made from Canson XL watercolour paper. Using Kuretake Zig Clean Color Real Brush markers in Orange, Yellow, and Light Green with the Rosa Canina Duo stencil, I coloured the lines of the flowers. Before removing the stencil, I spritzed it with water to activate the colour. Once I removed the stencil, I again spritzed over the image to allow the colours to start to move and blend. Next, I used a watercolour paintbrush and water to direct the colour movement as desired. After letting it dry, I realigned the stencil and went back over the lines with the Clean Colour markers to add definition to the flowers. Then, I painted with water around the image and added Cobalt Blue Clean Colour to add in a background. Once dry, I stamped the Thinking of You sentiment and added some green splatters.


*****
Magenta products used:

TM259 Rosa Canina Duo
TM259 Rosa Canina Duo 
Thinking of you - Small
07.982.E  Thinking of you - Small 

I hope you enjoyed this watercolour card technique and give it a try.

TTFN,


Thursday, August 30, 2018

Floral Thanks


 I was so excited when I saw the new Large Floral Background Stamp as part of the newest Magenta collection. I knew it was going to be perfect for a watercolour stamping technique and watercolouring... and it didn't disappoint!


I started with a piece of 140 lb watercolour paper positioned in my MISTI stamping tool. I loaded the Floral Background stamp with Twisted Citron Distress ink and spritzed the stamp and the watercolour paper a couple of times before stamping. I let the stamp rest on the watercolour panel for a minute to let the colour absorb into the paper. I loaded the stamp again and stamped the panel. Then, I swiped the panel in a variety of spots with Mowed Lawn Distress ink to provide some variation in the greens. Once dry, I watercoloured the empty flower petal spaces with a combination of Spun Sugar and Abandoned Coral and added touches of squeezed Lemonade to the flower centres. While it was drying, I heat emboss stamped the Thanks sentiment on vellum. I trimmed the watercolour panel and adhered it to a cardbase before adding the sentiment with clear foam 3D tape.


*****

Magenta products used:


TTFN,


Monday, August 27, 2018

Art Journaling with Soul Journey - Inspired by Vicki


I have another art journal page today that I made with inspiration from Soul Journey 2018. If you are interested, you can find the art journaling group on Facebook and it is an extension of Art and Soul Studio. The year long event has an amazing line up of exceptional mixed media artists.


This page was inspired by Vicki BoutinI started journaling in my 9" x 12" Strathmore 400 series Mixed Media Visual Journal using Vicki's script stencil and light green art crayon. Then, I used the two greens and the blue-green with the solid circle stamps to stamp my design. Next I used the burst stamp and rings with Cloudy Sky StazOn. I added some dots and line doodles before stenciling with the awesome Gold Glaze CreativFX. I watered some down and added some splatters. While that was drying, I coloured the watercolour stick butterflies and title. Once I added them to the page, I called it done.


Supplies: 400 Series Mixed Media Journal (Strathmore), Vicki Boutin Cool Art Crayons, circle stamps, stencils, watercolour stickers and CreativeFX Gold Glaze (American Crafts), Cloudy Sky StazOn (Tsukineko)


You can check out Vicki's video here and be inspired to create your own take on it.


TTFN,


Sunday, August 26, 2018

Going Old School


Hi creative friends! Today, I made a tag to play along with Simon Says Stamp's Back to School Monday challenge and More Than Words Mini Challenge - Old.

I love old things! I love century homes, antiques and old school items, hence the old Canadian Speller that I used as a photo prop. It was a natural fit to dig into my Tim Holtz stash and gather a bunch of items that fit the bill.


Spray Stain, texture paste, Distress inking and distresssing, all age the newer pieces to match the aged image pieces from a variety of Tim Holtz ephemera packs. I used a circle cut from an old dictionary to create the reinforcer for my improvised tag made from the pocket card matted on a distress kraft backing. The "going old school" sentiment was created on my computer using a typewriter font and the crinkle ribbon was custom coloured with Antique Linen and Vintage Photo spray stains.


I had math, language arts and science covered but I hemmed and hawed about the addition of the fleur de lis (representing french language learning) charm. I was challenged with whether with it, it reduced the white space area and drew the eye. Here is the version with the charm. 


With or without the charm... which do you like best?

Be sure to pop on over to the two blogs to see some wonderful inspiration from their designers as well as fellow entrants.


TTFN,

Supplies: Tim Holtz Broken China, Antique Linen and Vintage Photo Distress Spray Stain, Vintage Photo Distress ink, Texture paste, multi medium matte (Ranger), Cargo Layering Stencil (Stampers Anonymous), Tim Holtz 3 1/4 x 6 1/4 sized pocket card, Thrift Shop and Emporium ephemera pieces, pen nib, quote chip, fleur de lis adornment, jump ring, Crinkle Ribbon (Advantus), kraft paper (CTHM), dictionary page, white cardstock and typerwriter font (Misc.)

Thursday, August 23, 2018

Art Journaling with Soul Journey - Inspired by Aga


I am finally getting around to posting some of the art journal pages that I made from inspiration derived from the Soul Journey 2018. You can find the art journaling group on Facebook and it is an extension of Art and Soul Studio. The year long event has an amazing line up of exceptional mixed media artists, many of whom I am admire.


This page was inspired by Aga BaraniakI started journaling in my 9" x 12" Strathmore 400 series Mixed Media Visual Journal using the Carabelle Studio Journal du Jour stamp, gesso and the butterfly/moths from Tim Holtz Melange Tissue Wrap coloured with Dina Wakley Peacock acrylic paint.


I masked off the butterflies before stamping with the KaiserCraft Flutter stamp. Then, I added a layer of Tim Holtz Rock Candy Distress Crackle Paint. 


Once that was dry and crackled, I put the butterfly masks back on to add the Eggplant and Black Dina Wakley acrylic paints and Peacock splatters. Once all was dry, I used a Quickie Glue pen to go over the chevrons and added gold Deco foil as well as using a lid and glue with foil to add the rings.


Lastly, I adhered the quote created on my computer with a typerwriter font printed on cardstock and added some doodling on the butterflies.

You can check out Aga's wonderfully video here and be inspired to create your own take on it. If you do, be sure to share it with the Soul Journey group.

TTFN,

Supplies: 400 Series Mixed Media Journal (Strathmore), Journal du Jour stamp (Carabelle Studio), Jet Black Archival ink, Matte Multi Media, Tim Holtz Rocky Candy Distress Crackle paint, Peacock, Eggplant and Black Dina Wakley Heavy Body Acrylic Paint (Ranger), gesso (Liquitex), Tim Holtz Idea-ology Melange Tissue Wrap (Advantus), Flutter stamp (KaiserCraft), Quickie glue pen (Sakura), Gold iCraft Deco Foil (Therm-o-web), Visions Fine Black pen (Uniball), misc. typerwriter font and cardstock

Wednesday, August 22, 2018

This Smile


It has been a bit since I have made a scrapbook layout. This mixed media one was one that I had started last year and finally got to finishing at Crop and Create Torinto this year.


I started with the Creative Scrapbooker's Superstock base covered with clear gesso prior to watercolouring with Tim Holtz Cracked Pistachio and Stampin' Up's Pretty in Pink, stamping with the CTMH My life is so blessed sentiment stamp and splattering with Tattered Angels Vintage Pink and Tim Holtz Picked Raspberry to match the Maggie Holmes Crate Paper collection. I added lots of textures with a variety of trims, mesh, film strip and wood veneer. I added a hand cut and blanket stiched felt heart too.

It felt really good to make a layout. I really have to get into the habit again of making them on a regular basis.


TTFN,


Supplies: Crate Paper Maggie Holmes patterned paper and overlay, Royal Dear Lizzy Thickers, velvet rickrack (American Crafts), cardstock (Creative Scrapbooker Superstock), clear gesso (Liquitex), inks [Tim Holtz Cracked Pistachio and Picked Raspberry (Ramger), Vintage Pink (Tattered Angels), Pretty in Pink (Stampin' Up)], sentiment stamp and white cardstock (CTMH), Tim Holtz Idea-ology Film Strip (Advantus), mesh (Magenta), crochet trim (Maya Road), wood veneer (Prima), butterfly punch (Martha Stewart), embroidery floss (Loops & Thread), pen (Staedtler), and doily, staples, felt and pink ribbon (Misc). 

Sunday, July 29, 2018

Stencilled Background Watercolour Card


Hello friends! Like everyone, I like to get more out of my crafting supplies, and today's Magenta card does just that as the textured background was created using a stencil.


Supplies: flower stamp, sentiment stamp & diamond stencil, Purple, Grass green & Jade Nuance powders (Magenta), Smooth Solar White 80lb cardstock (Neenah), Canson XL watercolour paper (Canson), Jet Black Archival Ink (Ranger), Versa Mark (Tsukineko), fine white emboss powder (Simon Says Stamp), black cardstock (Bazzill)


I started this card by running the Diamond stencil with a 4 1/4 x 5 1/2" piece of cardstock through my die cutting machine with an embossing pad to create a dry embossed textured background. I splattered it with Grass Green Nuance mixed with watercolour. Once dry, I trimmed off a 1/4" from the side and the top so that it would fit onto a 4 1/4 x 5 1/2" cardbase. I added dimension by adhering it with adhesive foam to the base.


Next, I stamped the Azalea multiple times using Archival ink on to Canson XL 140 lb cold press watercolour paper. After watercolouring the flowers with Purple Nuance and the leaves with a mix Grass Green and Jade Nuance, I let them dry. Once dry, I fussy cut the flowers out seperate from the leaves being careful not to cut up the leaves. Next, I cut out the leaves. Then, I arranged some of each into a pleasing cluster and glued them such that they still had dimensional layers. I added some black glitter glue on to all the stamin centres. While that has drying, I white heat embossed the Thank You part of the sentiment stamp onto a thin strip of black cardstock and snipped it to form banner ends. Lastly, I added that with foam tape to pop it up. 


I hope you enjoyed today's card and that you give stencil dry embossing a try.

TTFN,


*****

Magenta products used:

Saturday, July 14, 2018

Quick Cards


Hello Crafty Peeps! Sometimes all you need is a beautifully designed stencil, a stamp and some inks to make quick simple yet effective cards. I am sharing two Magenta cards made with a similar design on two different size card bases.


Both cards were made with precut and scored bases that can be found at a craft store. The first one is on 4 x 5 1/2" folded card base that I had aligned the Laces stencil in the centre before securing both with some tape (painter's tape or washi works best). Next, I started at the top and the bottom, using Peacock Feathers and Twisted Citron Distress inks and a blending tool, to gently and gradually add colour; first with the blue and then green. I was light of hand and built the colour intensity up at the ends and faded to nothing in the the middle where I would stamp my sentiment. On this card, I used the smaller Thank You sentiment as it was proportional to the card size.


Supplies: Laces Stencil and Sentiment stamp (Magenta), Reflections cardbase (Michaels), Tim Holtz Peacock Feathers and Twisted Citron Distress inks, Black Soot Archival Ink (Ranger)

On the second card, I wanted to show you how you can use the stencil size as is using a 5 X 6 1/2" cardbase and a simple placement design that works for it. I first secured the cardbase at the top and bottom to my craft mat with tape. Then, I aligned the Laces stencil with the centre of the card and secured it on the right and left sides as that is where they are larger than the base. I followed the same inking process as I outlined above however this time I used the same colours but in their Distress Oxide forms. I left a larger fade out to white in the centre to accommodate the larger Thanks sentiment. To finish this card off, I added some bling with some larger clear jewels in the centres of the each repeated design area.


Supplies: Laces Stencil and Sentiment stamp (Magenta), Reflections cardbase (Michaels), Tim Holtz  Peacock Feathers and Twisted Citron Distress Oxide inks, Black Soot Archival Ink (Ranger), jewels (Flourish with a Bling)


I just have to say that I am really loving the Peacock Feathers and Twisted Citron colour combo on these. Unfortunately the photos really do not capture the vivid nature of them in real life.


TTFN,


*****
Magenta products used: