Pages

Monday, August 28, 2017

Turn Your Can'ts Into Cans ATC


The third ATC that I made for this week's Simon Says Stamp Monday Challenge is chock full of techniques and layering. This one is actually a reworking of one with the same stamped sentiment that I previously did not like how it turned out.


So I stripped it down to the base and covered the background by scrapping gesso on it to hide the previous background and prep the surface. I then, painted it with Dina Wakley Tangerine Heavy Body acrylic and once dry, I stenciled it with the Magenta Quatrefoil stencil with gesso. I stamped the Magenta sentiment with Tim Holtz Black Soot Archival ink and then covered it with clear fine embossing powder and heat set it. Next, I adhered the mesh with gel medium and then splattered the base in Black acrylic paint and with a white poster marker. Once dry, I assembled the ATC from little bits that I both reused from the original project as well as some leftover little pieces from my past creations. Besides the mesh, I reused the punched butterfly and sequins from the original project. From previous projects I used the muslin glass bead gel stenciled flowers that I fussy cut out and and the silhouette cut foliage which I coloured with Cracked Pistachio Distress ink to match the mesh and .

Learn more about the current Simon Says Stamp Monday challenge and see the DT inspiration ATCs here.

TTFN,


Love This Day ATC

This is the second ATC that I made for this week's  Simon Says Stamp Monday Challenge.


I used an emboss resist technique with the oldie but goodie Heidi Swapp Love stamp and then coloured the Ranger watercolour base with Heidi Swapp sprays in Mustard and Pink. A label maker piece for "this day", some wood veneer hearts and doodling finished it off.

Learn more about the current Simon Says Stamp Monday challenge and see the DT inspiration ATCs here.
TTFN,


Coffee Filter Flowers


Hi crafty friends! I am over on the Magenta blog today, sharing one of my favourite flower techniques that I taught at Creativation this year. Using coffee filters to make light, airy, and easily shaped flowers is far more forgiving than using tissue paper and perfect for novice to intermediate crafters alike. Colouring them with Nuance powder gives a beautiful intense watercoloured effect. I used my finished fussy cut flowers on this Feel Better Soon watercolour card.


For step-by-step instructions on how to make the flowers and this card, head over to the Magenta Blog here.


TTFN,

Magenta products used:

Feel better soon
07.967.G

Sunday, August 27, 2017

Bloom ATC

I decided to make a few ATCs for this week's Simon Says Stamp Monday Challenge. On the first one I am sharing,  I used the same technique that I used on the front cover of the notebook that I made for this month's Emerald Creek Dare DT inspiration piece.


Supplies: Kimilese Script stamp, Spider Chrysanthemum Stamp, Clear Fine Embossing Powder (Emerald Creek Craft Supplies), Tim Holtz Tumbled Glass, Picked Raspberry, Mowed Lawn Distress inks, Coffee Archival ink (Ranger), VersaMark ink and Black StazOn (Tsukineko), 400 Series cold press watercolour paper (Strathmore)


This time I gave it a blue background using Tumbled Glass Distress ink. Once I did the embossing part, I watercoloured the flower and stem with Picked Raspberry and Mowed Lawn Distress inks. I finished it off with Tim Holtz Idea-ology letter stickers and inked the edges.

To learn how to do the three layer emboss resist technique, check out this post. Learn more about the current Simon Says Stamp Monday challenge and see the DT inspiration ATCs here.

TTFN,


Shabby Glam Thanks

The Frilly & Funkie's current On the Cutting Edge challenge has participants creating with dies, punches, or cutting tools. I am joining in the challenge with some shabby chic glam.


Supplies: patterned paper (Simple Stories), cardstock (CTMH and Creative Scrapbooker Super Stock), mini Damask stencil (The Crafters Workshop), clear matte texture paste (Ranger), glitters (Recollections), frame cut file (Silhouette), Hammered Metal emboss powder (Emerald Creek Craft Supplies), thanks die cut (Simon Says Stamp), glitter glue (Hampton Arts), vellum, (The Paper Company), clear 3D foam (Kool Tak), dictionary page (misc.)


I used a TWC mini damask stencil with texture paste and 3 colours of pink glitter to create an ombre background on an upcycled dictionary page which I mounted onto a wood plank patterned paper piece. 


A Hammered Metal embossed Silhouette cut frame backed with vellum and popped up with clear foam tape creates a focal point for the glitter glued die cut Thanks sentiment.


Initially, I couldn't decide whether to go with a dictionary page or an old book text page so I made two similar versions of the card. 


Supplies: patterned paper (Simple Stories), cardstock (Bazzill, CTMH, Creative Scrapbooker Super Stock), mini Damask stencil (The Crafters Workshop), clear matte texture paste (Ranger), frame cut file (Silhouette), Hammered Metal emboss powder (Emerald Creek Craft Supplies), Painted thanks and you die cuts (Simon Says Stamp), Tim Holtz Antique Linen Distress Paint (Ranger), glitter glue (Viva Decor), vellum, (The Paper Company), clear 3D foam (Kool Tak), old book page, vintage Rose Pink and Lavender glitters (misc.)


On the second version, I used two colours of vintage rose and lavender pink glitter which coordinated better with the aged text page colour. I changed the orientation of the wood plank patterned paper as well as the slightly larger frame orientation.


I cut off the "s" from the die cut Thanks and added a die cut You. I coloured both with Tim Holtz Antique Linen Distress paint and added glitter glue.

You can see the DT's inspiration pieces and learn about the Frilly & Funkie challenge details here.

TTFN,


Friday, August 18, 2017

Delightful - Moodiversary

I'm on a roll! Made another mixed media creation inspired by the Our Mixed Media Moods Moodiversary Mood Board.  I cut a 3x5 piece from my upcycled paper Teriyaki Experience's take out container and used the fuchsia, turquoise, lime, and yellow colours plus the flowers (row 3, column 4) for inspiration.


Supplies: Teriyaki Experience paper to-go packaging, clear gesso (Liquitex ), wht. gesso (Golden), Flower Duo mask and Flower Duo stencil (Magenta), Dina Wakley Magenta, Lemon, Turquoise, Lime and White Scribble Sticks, Dina Wakley Fuschia Heavy Body Acrylic paints,  Graphite All pencil (Stabilo), modeling paste (Pebeo), Tim Holtz Big Chat sticker (Advantus), cheese cloth (misc.)


For more Moodiversary inspiration, check out both DeeDee Catron's and Jenn Engle's creative process videos on their YouTube channels based on the mood board as well as all the other participant pieces on the weekly link up posts.


To play along, get inspired by anything on their moodiversary moodboard...


... have fun creating a mixed media masterpiece and link up on DeeDee's blog.

TTFN,


Thursday, August 17, 2017

Little Things ATC - Moodiversary

Made a second ATC inspired from the Our Mixed Media Moods Moodiversary Mood BoardI used another piece from my upcycled paper based Teriyaki Experience's take out container. Drawing from the moodboard, I used the Turquoise and Yellow colour inspiration that went along with the bottom right photo inspiration (4th row, 6th column).


Supplies: Teriyaki Experience paper to-go packaging, gesso (Liquitex & Golden), Branches stencil from the Seasons Trio  (Magenta), Dina Wakley Ocean and Lemon Heavy Body Acrylic paints, Dina Wakley Umber and Lemon Scribble Sticks, Graphite and Black All pencils (Stabilo), Texture Paste(Ranger), Tim Holtz Clippings sticker (Advantus), dried baby wipe (misc.)


I started with a light coat of Liquitex gesso that I removed most of so that the packaging text would still show through. Next, I scraped on some Golden gesso which has a thicker consistency. Then, I applied some watered down Dina Wakley Ocean paint with both a paint spatula and my finger. Using the Branches stencil from the Magenta Seasons Trio stencils, I smoothed on texture paste and then, set it aside to dry.  While it was drying, I added more colour to a paint used baby wipe by adding watered down Lemon acrylic paint and then when dry, adding some more colour with a Lemon Scribble Stick. Next, I went back to the dried texture paste branches and bird and coloured them with an Umber Scribble Stick; adding shadows and depth with both Graphite and Black Stabilo All pencils. Once, I was pleased with my shading, I cut up small pieces of the dried used baby wipe to fashion flowers like in the inspiration photo. They sort of resemble forsythias. Lastly, I added a little Tim Holtz Clippings sticker to finish it off.

For more Moodiversary inspiration, check out both DeeDee Catron's and Jenn Engle's creative process videos on their YouTube channels based on the mood board as well as all the other participant pieces on the weekly link up posts.


To play along, get inspired by anything on their moodiversary moodboard...


... have fun creating a mixed media masterpiece and link up on DeeDee's blog.

TTFN,

Monday, August 14, 2017

Don't Overthink It

I hadn't art journaled in sometime and recently I spent a little "me" time doing just that. I decided to work in my Moleskine art Journal and just started by gessoing a bunch of pages. It was a relaxing start as I would sketch out design ideas and gather supplies for my first pages as I waited for the gesso to dry. 


I knew I wanted to work with Dina Wakley media products and create some pages for her Show Us Your Media challenge. This month's focus for putting the ME in MEdia is "Create a piece of art about the things you say to yourself."

I knew that I wanted to use the "Hey You" stencil phrases as I bought them because many really resonate with me. I have loved listening to Dina over the past two years, since I became hooked on her easy going manner and laissez faire attitude in both videos, her written musings, and in person. I chose to go with this first one because it has been an issue for me.


Supplies: Dina Wakley Heavy Body Acrylic paints [Lime, Ocean, Night, White, Black], Umber and WHite Scribble Sticks, Wheels and Hey You stencils, Leaves mask, Scribbly Birds stamp, Gel Medium, Jet Black Archival ink (Ranger), white and clear Liquitex gesso, dictionary text page and tissue paper (misc.)


I am happy to say that I have been learning to break my perfectionist habit by diligently using this as a mantra along with... her "Oops oh well" and "better done than perfect". I am getting faster in my choices and letting little things go.

As for some interesting points in the creating process of this piece:
- I used the stamping on tissue technique so that I could use the reverse image of the bird for the orientation that I wanted. While I originally thought that I was going to paint the bird, I really liked the black and white effect it had on the page so I left it and coloured it in with a white Scribble Stick so it was not so transparent but became more opaque.
- I used my newly purchased Dina Wakley Media Tools... the flat piece large end one... to mark make with Night paint on my page. I made the marks by loading the silicone end with paint, placing it where I wanted it and then slightly pivoting from one end.

This page makes me happy. I like the colours, the design and that I took the "don't overthink" to heart when there was mask and stencil bleeding. 

TTFN,


Saturday, August 12, 2017

Just a Note and Pencil


I had so much fun making my DT project for this month's Emerald Creek Anything Goes Dare that I made not one but two projects that coordinate. I took a dollar store notebook and pencil and transformed them into these with a little EC flare!


I started the notebook transformation by giving the cover two coats of gesso, allowing it to dry in between layers. Next, I slathered on a layer of Tim Holtz Grit paste with a palette knife and let it set up for a few minutes. Then, I spritzed the Kimilese stamp and stamped it into the grit paste; cleaning it off as needed and re-wetting it so as to not get stuck full of grit paste. I set the book aside to dry and worked on the watercolour panel. 


Once it was dry, I spritzed the cover with water and then generously sprayed Tim Holtz Distress Stain, letting the water and stain mix to work their magic. Again, I set it off to dry.


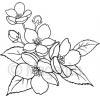
The techniques for the watercoloured chrysanthemum piece work best by using a positioning tool; In this case, I used my MISTI. After positioning the Spider Chrysanthemum stamp in the MISTI tool with a 400 Series piece of Strathmore watercolour paper, I loaded the Kimilese stamp with Coffee Archival ink and stamp kissed it onto the Chrysanthemum stamp. Then, I stamped the Chrysanthemum stamp to the watercolour paper. It gives a reverse image imprint but it is not an issue in this case because the font is not very legible; however, it gives the look of script that I wanted. It is very important to use a waterproof ink like the Archival ink for that first step as it will not run once dry for the next steps. 


After cleaning of the ink from the flower stamp, load the stamp with Antique Linen Distress ink and spritz both it and the watercolour paper with water before stamping the image over the previously stamped script. Once dry, use a static tool over paper image and load the flower stamp again but with VersaMark ink. Cover with fine clear embossing powder and heat set. This will leave the petals and stem areas of the Spider Chrysanthemum clear and easy to watercolour as the emboss powder sets the Antique Linen section and resists the watercolours. Using Distress inks smooched on a craft mat and a water brush, colour the petals with Peacock Feathers and the stem with Mowed Lawn. Lastly, I wet the edges of the watercolour paper with the water brush and tore them off to leave the distressed raw edges.


Taking kraft cardstock, I cut it to a 4 5/8" x 7 5/8" sized panel. Then, I stamped the Just a Note at the centre 3/4 mark down the piece with VersaMark ink and covered it with a custom combination of Candy BrownVegas Gold, and Mirror Gold embossing powders. Next, I distressed the edges and inked them with Coffee Archival ink to match the script font stamping on the watercoloured piece and then, wrapped the hemp twine around the centre section. I adhere the kraft panel to the notebook cover with gel medium and left it to dry.


Supplies: Kimilese Script stamp, Spider Chrysanthemum Stamp, just a note stamp, Clear Fine Embossing Powder, Candy Brown Embossing Powder, Vegas Gold Embossing Powder, Mirror Gold Embossing Powder (Emerald Creek Craft Supplies), Tim Holtz Grit Paste, Antique Linen Distress Stain Spray, Antique Linen, Peacock Feathers, Mowed Lawn Distress inks, Coffee Archival ink, Dina Wakley Gel Medium (Ranger), VersaMark ink (Tsukineko), gesso (Golden), 400 Series cold press watercolour paper (Strathmore), ribbon (May Arts), natural hemp cord (Darice), notebook (Dollarama) 


Once dry,  I foam taped the back of the watercolour stamped piece and adhered it in the top half section. Lastly, I threaded the beautiful May Arts ribbon through the spirals and tied it off hiding the knot by rotating the ribbon through the spirals a bit at the bottom.


It is amazing what embossing powder will transform! I "coloured" the pencil by taping off the metal and the sharpened tip ends with painter's tape and rolled it across a Versamark ink pad to cover it completely. Then, I covered it with Turquoise Sparkle emboss powder to match the blue of the chrysanthemum. 


Supplies: Cerith Seashell Stamp, Seahorse Stamp, Turquoise Sparkle Embossing Powder, Metal Turtle Brad, Ancient Anchor Charm, Citrine Gemstones (Emerald Creek Craft Supplies), VersaMark ink, Timber brown, Saddle Brown, Teal Blue StazOn inks (Tsukineko), pencil crayons, (Crayola), Shrink-It (Aleene's), Natural Hemp Cord (Darice), Tim Holtz Idea-ology Jump Rings (Advantus), 1/2" x 1/8" Pop Up Dot (Glue Dot), pencil (Dollarama)


It has been a long time since I used shrink plastic but it was the perfect way to accessorize the pencil. I took a piece of Shrink-It plastic and lightly sanded one side. Turning it over, I stamped with StazOn ink on the clean side. I stamped the Cerith Seashell once in Timber Brown and once in Saddle Brown. I stamped the Seahorse in Teal Blue. Next, I turned the sheet over to the sanded side and added touches of colour with pencil crayons before carefully cutting them out and hole punching with my Cropadile. Then, on a parchment lined cookie sheet, I shrunk all three with an embossing gun. I coloured the Ancient Anchor Charm with some Tim Holtz Walnut Distress Paint, letting it set up a bit and then wiping some of it off. I added jump rings to all four pieces and tied on some hemp twine to each.


To attach the charms to the top, I used a turtle brad which I coloured with brown and green Sharpies. I pushed the brad into the eraser and tied on the four charms at a variety of lengths.


To cover the metal and finish the pencil off, I took two large dimensional pop dots and stretched then around the top until they were secure. Then, I pressed in the Citrine stones until completely covered. And there you have it... one kickin' pencil!

Here is one last look at both projects together...


Now it's your turn. Let your imagination go where it may and come play with this month's dare. Full details, other design team member's inspiration pieces, and contest link up can be found here on the Emerald Creek Dares Blog.


TTFN,


Emerald Creek Supplies Used:


Friday, August 11, 2017

Stencil Stamping with Magenta

A fun way to stretch your stencil collection is to stamp with them. For this Magenta card I am sharing today, I used a thin lined stencil which worked perfectly for this stencil stamping emboss resist technique.


Using the Triangles stencil, I loaded it with Versamark ink and then "stamped" it onto a piece of 140 lb cold press watercolour paper. Next, I added clear emboss powder and heat set it. Then, in a palette tray, I mixed each of the four colours of Nuance powders (Hot PinkGrass GreenSpring Green, and Aquamarine) with water and watercolour painted with them.


On a piece of vellum, I stamped the sentiment stamp with Versamark ink and heat embossed it with black emboss powder. I adhered the vellum, using Kool Tak Clear Foam adhesive, which gives it dimension. To finish it off, I added some Simon Says Stamp Assorted Moonshine sequins.


TTFN,

Magenta products used:

Wednesday, August 9, 2017

Moodiversary Sing ATC

Continuing with inspiration from the Our Mixed Media Moods Moodiversary Mood BoardI used another piece from my upcycled paper based Teriyaki Experience's take out container. This one I cut for an ATC and used both colour inspiration (Melon, Fuschia, and Green) as well as the flowers photo (3rd row, 5th column).


Supplies: Teriyaki Experience paper to-go packaging, clear gesso (Liquitex), wht gesso (Golden), Small Field of Flowers mask (Magenta), Dina Wakley Lime and Blushing Heavy Body Acrylic paints, Dina Wakley Magenta, Umber and Tangerine Scribble Sticks, Dina Wakley Scribbly Small Birdies stamp(Ranger), XL watercolour paper (Canson), Tim Holtz Alpha stickers (Advantus), twine, decorative grass (misc.)


I started with a clear gesso base so that the packaging text would still show through the mix of Dina Wakley Blushing paint mixed with some Scribble Stick Magenta, once I texture pasted with a Magenta small Field of Flowers mask. I painted the texture paste area with Lime and added little touches of gesso. The flowers were given more detail with a black Stabilo All pencil and lots of water. The little Dina Scribbly Small bird was stamped using an Umber Scribble Stick and spritzed water on watercolour paper and then coloured with a titch of Umber and Tangerine. Some twine, decorative grass, and Tim Holtz alpha letter stickers finished it off. This little birdie is ready to sing for some lucky recipient somewhere in the world.


For more Moodiversary inspiration, check out both DeeDee Catron's and Jenn Engle's creative process videos on their YouTube channels based on the mood board as well as all the other participant pieces on the weekly link up posts.


To play along, get inspired by anything on their moodiversary moodboard...


... have fun creating a mixed media masterpiece and link up on DeeDee's blog.

TTFN,


Tweet, tweet - Our Mixed Media Moodiversary


Have you seen the Our Mixed Media Moods Moodiversary Mood Board? It is awesome and chock full of cool inspiration photos and colours. I have been totally sucked in watching both DeeDee Catron's and Jenn Engle's creative process videos on their YouTube channels based on the mood board and they got me itching to play along.


Supplies: Teriyaki Experience paper to-go packaging, gesso (Liquitex and Golden), Whipped Spackle (Faber-Castell Design Memory Craft), Petal Trio and Spring Blooms stamps (Magenta), Dina Wakley Ocean, Lime and Blushing Heavy Body Acrylic paints, Dina Wakley Scribbly Birds stamps, Jet Black Archival ink (Ranger), stamped bird on patterned paper and medical tape (misc.)


I decided to start by upcycling a paper based Teriyaki Experience's take out container that I wiped clean and cut it into a variety of sizes for bases. I loved the kraft colour and Japanese text and while I was eating my delicious meal, thought that it would make a cool background starting point for a variety of creations. My first project, made from it, is this 4 x 6 piece inspired by the Melon, Turquoise, and Green colours of the moodiversary board.


I started by scraping on some gesso and then stamping into Whipped Spackle paste with a Magenta Petal Trio flower stamp from the latest collection (I hadn't done spackle stamp embossing for a while and I was totally inspired by one of DeeDee's videos). Then, I used Dina Wakley Heavy Body Acrylic paints to add colour. I used Ocean to colour the flowers and the top corner as well as some splatters. I used Lime with bubble wrap to stamp three areas as well as added some to the medical tape that I adhered to the bottom section.


Next, I used Jet Black Archival ink with the Magenta Spring Blooms silhouette stamp and then added some swipes of Blushing paint to match the fussy cut melon coloured stamped bird which I received from fellow Get Messian Art Journaler, Sarah Rondon, from a swap that we both participated in. Then, I added the Dina Tweet, Tweets which I stamped onto cardstock and cut out. Lastly, a few finger swipes of gesso and I called it done.

To play along, get inspired by anything on their moodiversary moodboard...


... have fun creating a mixed media masterpiece and link up on DeeDee's blog.

TTFN,