Pages

Showing posts with label alcohol inks. Show all posts

Monday, August 30, 2021

Alcohol Ink Transfer Card


Hello Crafty Friends! Today I am on the Magenta Blog with this soft coloured kraft card made using Alcohol Lift Ink.  I have used the pre-stamping with a white pigment ink on kraft for a past card creation on the Magenta Blog (you can see it here) and wanted to experiment with how it would work with transferring the colour from an alcohol inked panel on top of the pigment ink. I think you will agree that it works great!


First, I made the alcohol inked panel on Yupo using blending solution, Amethyst, Pool, Turquoise, & Citrus Alcohol inks.

This is another technique that works best with a stamp repositioning tool. I folded the kraft cardbase and placed it in the MISTI. I positioned the Mandala stamp partially off the side and stamped it multiple times with white pigment ink. After cleaning off the pigment ink, I swapped out the card for the inked Yupo securing it in place. I loaded the stamp with Alcohol Lift ink and stamped the panel. Next, I swapped the panel for the card and stamp transferred the alcohol ink that had been transferred to the stamp over the white pigment ink image. I repeated this process multiple times until I was happy with the colour coverage and intensity. I added some white splatters and set it aside to dry. Then, I white heat embossed stamped the Hello sentiment on vellum and fussy cut it before adhering it. To finish off the card, I added jewels around the mandala pattern.

I hope you liked this technique and that I have inspired you to give it a try. You can check out my Be Happy card here for more kraft with white pigment ink card ideas.

TTFN,


********
Magenta products used:

Flower Mandala - Large

Wednesday, July 15, 2020

Bleeding Art July Challenge - Fleur


Hi crafty friends! Today starts a new challenge month at the Bleeding Art Challenge Blog. As always it is an Anything Goes mixed media challenge. My Design Team inspiration creation for this month is a home decor canvas. I have a love of vintage things and even better if they are French inspired. This piece checks both boxes.


The background canvas was created with a layered resist technique using micro glaze and fluid acrylic paint. I started by covering the canvas with vintage collage medium. Next, I stenciled micro glaze through the Harlequin stencil and then sponged the whole canvas with slightly watered-down Emerald Fluid Acrylic. Once that was dry, I stenciled micro glaze through the Gothic stencil and sponged on watered-down Umber Fluid acrylic.


Once that was dry, I wiped off any residual micro glaze. I decided that the canvas needed some colour framing so I sponged on umber along the sides and edges and wiped some away as I went to keep with the distressed look.


Supplies: Canvas and metal letters (Dollarama), Tim Holtz Harlequin and Gothic Stencils (Stampers Anonymous), Vintage Distress Collage Medium, Distress Micro Glaze, Gold Alcohol ink Mixative (Ranger), Finnabair Emerald and Umber Fluid Acrylic (Prima), fleur de lyse ornament (RAZ imports)

While that was drying, I brushed on some Gold Mixative Alcohol ink onto parts of the metal letters so as to match the touches of gold on the fleur de lyse. Once all was dry, I adhered the fleur de lyse and metal letters to the canvas and called it done.

Here's another look at the completed canvas:


Head on over to the Bleeding Art Challenge Blog here to see my fellow DTs' inspirational pieces and get details on entering the challenge.

TTFN,

Friday, June 19, 2020

Steampunk Blog Hop


***UPDATED July 5th: Bookmark and ATC giveaway is closed.

Winners are Penny -Bookmark & Elle - ATC. Congrats ladies! Please send me your mailing info so I can get these out to each of you.***

***UPDATE June 23rd: Commenting for Blog Hop prizes has ended. Commenting for my bookmark and ATC giveaway is open until Saturday, July 4th at 11:59 PM.***

Welcome, crafty enthusiasts! It's blog hop time with a spectacular array of steampunk creations with sixteen sponsored prizes up for grabs. My contribution to this sojourn is themed Sea, Land, & Air as I join in with a steampunk inspired bookmark and ATC.


The bookmark base is made from water spritzed and crinkled kraft cardstock topped with Stamperia Mechanical Sea World patterned papers including the glossy accent embellished fussy cut seahorse.


Some distressing with Tim Holtz Distress inks, chipboard gears from Creative Embellishments and cut out letters/words from the Mechanical Sea Worlds packaging completes the main part of the "Free to be Me" bookmark in order for it to maintain its functionality as an actual bookmark. Where I had more freedom to add dimensional pieces was with the "ribbon & charm" part that hangs outside of a book.


Supplies: Mechanical Sea World patterned papers (Stamperia), kraft carstock (CTMH), Glossy Accents, Walnut Stain Tim Holtz Distress Ink, Distress Collage Medium (Ranger), mini gear chipboards (Creative Embellishments), Cerith Seashell Stamp, Ancient Anchor Charm (Emerald Creek Craft Supplies), Timber Brown StazOn inks (Tsukineko), Shrink-It (Aleene's), Natural Hemp Cord (Darice), Tim Holtz Idea-ology Jump Rings (Advantus), glass beads (Misc.)

For that, I used hemp cord tied with glassbeads, a shrink plastic seashell stamped with the Emerald Creek Cerith Seashell stamp and an alcohol ink coloured anchor embellishment. I am so pleased with how this came together and that it is perfect for a steampunk enthusiast's use in a practical way.

Up next is this little up-cycled gem of an ATC. I like to reuse/repurpose what I can in art pieces and this one incorporates corrugated cardboard and shell plastic packaging as key elements in its design. It was an add-on item to my initial intention of just having the bookmark as a stand alone piece for this hop. As I waited for the hop day I wanted to make something that expressed the current world wide reflection of the status quo situation and came up with this. 


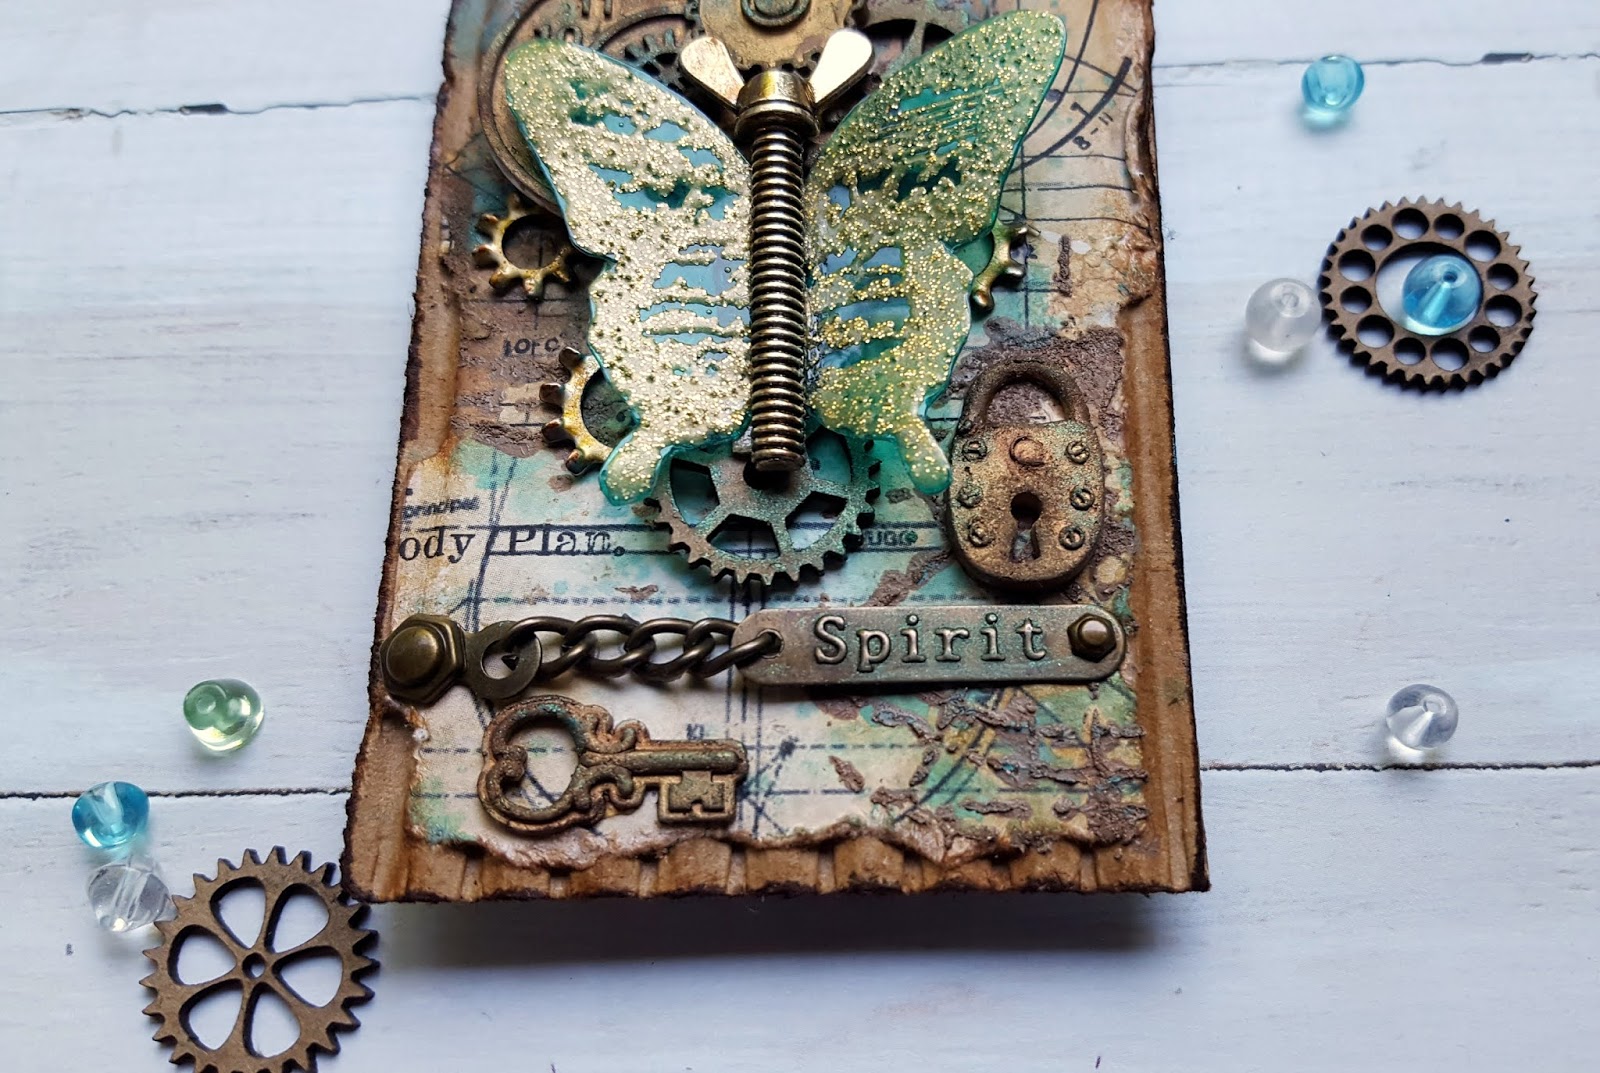
The "Unlock the Spirit of Change" ATC starts with a base piece of corrugated expose cardboard topped with a distressed piece of the Stamperia Mechanical Sea World patterned paper. After splattering it with Broken China Distress ink and Vintage Photo Distress inking the edges, I applied Tim Holtz Grit Paste mixed with Burnt Sienna Finnabair Fluid Acrylics through the Crafter's Workshop Mini Specimens stencil.


Supplies: Mechanical Sea World pattern paper (Stamperia), Mini Specimens stencil (The Crafter's Workshop), Finnabair Burnt Sienna Liquid acrylic, Mermaid Teal acrylic paint, Lucky Emerald Antique Brilliance, Ingvild Blome Stamp-N-Add Butterfly Wings (Prima), Tim Holtz Distress Grit Paste, Distress Collage Medium, Broken China, Vintage Photo and Ground Espresso Distress ink, Patina, Pool and Express Alcohol ink, Gold Mixative, Glossy Accents (Rangers), mini gears chipboard (Creative Embellishments), Mod Podge Industrial molds (Plaid), VersaMark ink (Tsukineko), Vega Gold emboss powder (Emerald Creek), Spirit metal tag (Dollarama), Tim Holtz Ideaology Hex Fasteners (Advantus), metal washer (Home Depot), cardboard and plastic packaging (Misc.)

On top of that is a collection of Creative Embellishments Mini Gears chipboard, Industrial Mod Podge molded gears, lock and key coloured with a combination of alcohol inks and Finnabair paint and wax. The butterfly was created from left over plastic shell packaging coloured with Patina and Pool alcohol inks and then heat embossed stamped with a Prima butterfly using Emerald Creeks Vegas Gold Emboss powder. The butterfly is mechanized with an alcohol ink coloured Prima metal wing screw embellishment hopefully giving the illusion that it is wound to fly as it is set free. There is much symbolism in this piece with elements purposely chosen that marry themselves well to express the message through a steampunk theme.

Now onto the give away part...


As for my blog's giveaway... it is both of these creations. Yes, you can become the owner of one of these crafty creations and yes, I am willing to snail mail them internationally so two lucky people can enjoy them. To be entered into my blog's Sea, Land and Air giveaway draw, you simply have to complete these two steps:


  1. Be a follower of my blog or my IG account here or become a follower of either and 
  2. Leave a comment below on this post stating which you would like to win e.g. ATC, bookmark, or either one.


My blog giveaway ends Saturday, July 4th at 11:59 PM. Please note that this is a different timeline than the Steampunk blog hop sponsored prizes which ends Monday, June 22nd.

As for a chance to win one of the 16 sponsored prizes for our Steampunk Hop - we're proud to say these are small businesses run by artists. Let's show them some love!
1) A Vintage Girl - $20 prize package
2) Angel Dream Crafts - $20 gift certificate (shipping not included)
3) Linda Israel Art - $50 gift certificate (shipping not included)
4) A Matter of Crafts - $20 gift certificate (shipping not included)
5) Expressions Craft - $25 gift certificate (shipping not included)
6) Nellys Artistic Creations - original artwork (see link for examples of her work)
7) Gecko Galz - $25 in digital products
8) Creative Embellishments - $50 (shipping not included)
9) Emerald Creek - $25 gift certificate
10) Electric Pandemonium - choose a $45 original artwork piece (shipping not included)
11) Thompson's Craft Supplies £20 (approx $25) (shipping not included)
12) It's Oddly Appealing - original artwork (see link for examples of her work)
13) The Funkie Junkie Boutique - $25 gift certificate
14) Hobbilicious - £15 (approx $19) (UK shipping free)
15) ITD - prize package worth £25
16) Stamperia - a pizza box prize pack

To have a chance of winning one of the 16 coveted prizes, leave a comment on this post, along with your email address or social media contact (IG, FB, etc) and what country you're from, from now through Monday, June 22nd. Sixteen winners will be picked randomly from all comments left from all of the artist's participating! The winners will be contacted via email/social media so it's important you leave your address/social media contact! Good luck and enjoy the hop!

For your next stop on the Steampunk hop, please head on over to Monica Longard's MonDo Creations.


If you are just beginning the Steampunk Blog Hop with your visit here on my blog, below is the full list of all the inspirational talented makers:
A big thank you goes out to Cathy Frailey (owner of Bleeding Art challenge blog and the coming in September Steampunk Challenge blog) for organizing this hop. Be sure to visit all the hop stops for some fun mixed media steampunk creations and be sure to leave some love!

TTFN,

Saturday, April 4, 2020

Card of the Month - Creative Scrapbooker Magazine


*** UPDATE: Yeah! I made it onto Round 2. Voting ends April 12th. ***

Hello fellow crafty friends! Some of you might remember this card that I shared after it came back from being published in the Winter 2018 issue of Creative Scrapbooker Magazine. Well,  Creative Scrapbooker Magazine combed through their past publications and picked cards for their new Card of the Month People's Choice contest. To my surprise, they picked my foiled alcohol ink card as one of the entrants. 


I am so grateful and excited to be chosen for the inaugural match up. There are 5 rounds of voting during the month of April and each round is time sensitive. This contest if just for fun. There is no prize other than the honour of being crowned Card of the Month. It would be so awesome to make it to the top so I am asking if you would please be so kind to go and vote for my card. You will find it in bracket 14 down near the bottom. You can head to their site for voting here.

You can vote in one, a few, or all the brackets. It's up to you. Your email address is used to vote and so you can log on to vote in subsequent rounds. 1st round voting ends April 5th at 11:59 PM EDT. Your vote would be greatly appreciated.

Here is a close up of the card that shows the foil accents and texture details.


Supplies: Silhouette Spring Flowers stamp and alphabet chipboard (Magenta), Yupo paper (Yupo), Tim Holtz Citrus, Pool, Turquoise Alcohol Inks and Blending Solution, Black Soot Archival Ink, Picket Fence Distress Paint, Multi Medium Gel (Ranger), Bora Bora Green foil (Prima), stones (Emerald Creek), cardstock (CTMH)


To make this card, I started with a 3 1/2" x 5" piece of yupo paper which I covered with alcohol blending solution and added drops of Citrus, Pool, and Turquoise alcohol inks in three rows from bottom to the top tilting the card to move the colours around. Once dry, I placed a green foiling sheet over top and burnished it onto the yupo background. Once peeled away, it sticks bits of foil to some of the tacky areas on the background.


From there, I stamped the Magenta Spring Silhouette Flowers with Black Soot Archival ink. Next, I adhered the panel to a white card base. Then, I added the white acrylic painted "You Rock" chipboard sentiment using the Mini Alphabet chipboard letters and added some green foiling to them. Lastly, to complete the card, I glued on some tiny stones along the bottom of the panel.

If you give this technique or silhouette stamp a try, be sure to share it with me. And thanks for voting!

TTFN,


Monday, April 29, 2019

Circles All Around


I was inspired by the Simon Says Stamp Monday Going Around in Circles challenge  that I made another card for the challenge. This one was made with foiled alcohol inked Yupo paper circles.


Not wanting to waste any of the awesome yellow, orange and blue coloured background that was left after fussy cutting out a stamped lifted design in the making of this card, I used a glue pen and added some gold foil accents.


Next, I used a variety of circle punches (3/8", 1/2", 3/4" & 1" sizes) to punch out circles. After arranging some of them on a 3 4/2" x 5 1/2" white card base, I adhered them at different level using glue, Glue Dots, and Foam to give them a variety of dimensions.


I die cut the Simon Says Stamp Script Thanks from Black Bazzill cardstock and adhered it to the card. Then, I stamped "a bunch" from a Winnie and Walter stamp set. To finish the card off, I doodled a double ring of faux stitches around three of the circles using a 05 Micron pen.


Thanks to Simon Says Stamp Monday Going Around in Circles challenge as it sparked some great ideas and I had circles of fun.

TTFN,


Sunday, April 28, 2019

Circles of Fun


I had created an alcohol inked circles background a long time ago but had never used it for anything. When I saw this week's Simon Says Stamp Monday Going Around in Circles challenge, it tweeked my memory and I went in search of it in my future use folder. I decided to turn it into this thank you card as an entry.


I added a Tim Holtz butterfly by stamping it with white pigment ink. When it was dry, I found it to be a tad too light and the ink had taken on some of the colour from the inks below, so I went over the image with a white pen. I mounted the panel onto a white cardstock background and adhered a Simon Says Stamped Painted Thanks die cut from white Bazzill cardstock.


The original background panel was created on Yupo paper using Tim Holtz Alcohol inks (Watermelon, Sunshine Yellow & Raspberry) and the mini Ringer stencil from Tim Holtz Stencil Set 7. I did some colour mixing in an alcohol ink storage tray to create the shade of colours that I wanted. Then, I used a paint brush and painted each circle of the stencil in a somewhat random design and I painted all the diamond shaped spaces in yellow. I was so pleased at the time with how it turned out. Now I am even happier with the finished creation!


Be sure to check out the other Going Around in Circles inspirational creations from their design team and from other participants.

TTFN,


Thursday, April 25, 2019

Alcohol Lift Ink Cards

Hello Crafty Mates!

Today, I am sharing two cards made from my first experimentation results using alcohol ink stamp lifting. My colour combo choice was inspired by last week's Color Throwdown colour combo #539. I knew that that particular colour mix would be a tricky challenge with using alcohol inks as there was the potential to make mud but I wanted to push myself out of my comfort zone and play to figure out a way to make it work.


This first one is a CAS version.


After adding Tim Holtz Alcohol inks in Sunshine Yellow, Valencia, Turquoise, and Pool mixed with Alcohol Ink Blending Solution onto 5x7" Yupo paper, I let it dry. Next, I used the Simon Says Stamp Emma Background stamp in my MISTI along with Ranger Alcohol Lift ink to stamp on the Yupo paper. Then, I switched out the Yupo for my 4 1/4" x 6 5/8" Neenah 80 lb Smooth Solar White cardstock base and stamped the lifted image onto it. Then, I reinked the stamp with the Lift ink and repeated the stamping on the Yupo background and then back onto the card base. That is where using a MISTI is invaluable in allowing perfect restamping positioning! Lastly, to finish the card off, I die cut the sentiment using the Simon Says Stamp Script Thanks combo wafer die using vellum for the background and four layers of Bazzill black cardstock for the inner Thanks piece and adhered it to the card.


The second card is a stepped up mixed media version of the first card's design using the stamped Yupo piece.


After removing any excess Alcohol Lift ink from the Emma Background stamped image, I buffed the image with a piece of paper towel to deepen the contrast with more ink removal. Next, I fussy cut out the design and added Prima turquoise foil to the areas of the alcohol ink that were still slightly tacky. I popped it up with some fun foam cut slightly smaller that the design shape and adhered it to the Yupo paper and a 5 x 6 1/2" kraft card base. Then, for some detailed embellishment, I hand cut and mini circle punched a small piece of felt and added it along with jewels in the colour combo's colours in orange, yellow and blue to match. Lastly, to finish this one off, I used the Simon Says Stamp Painted Thanks wafer die, layered four die cut pieces made with Bazzill black cardstock and adhered it to the card.


This close up shows the foiled detail a bit better.


This was the colour combo inspiration photo.


I am entering these cards into the Simon Says Stamp Flickr Challenge #121 Die-ing for Creativity challenge and the Happy Little Stampers Anything Goes with Dies challenge.

I hope you like this initial attempts. As I mentioned earlier that I knew the colour combo would be a tricky one to work with using alcohol inks, I didn't stop at creating one coloured Yupo base. I ended up making three so I look forward to creating more cards from them and sharing them with you in the future.


TTFN,


Wednesday, June 27, 2018

Silhouettes Part Two -You Rock!


Hello fellow crafty friends! Today, I am sharing another foiled alcohol ink card made on Yupo using the Silhouette Spring Flowers stamp that I made for Magenta. While last time I shared a darker background with a white silhouette with a blue foil accents (found here), this one has a lighter background and a black silhouette with a green foil accents.


Supplies: Silhouette Spring Flowers stamp and alphabet chipboard (Magenta), Yupo paper (Yupo), Tim Holtz Citrus, Pool, Turquoise Alcohol Inks and Blending Solution, Black Soot Archival Ink, Picket Fence Distress Paint, Multi Medium Gel (Ranger), Bora Bora Green foil (Prima), stones (Emerald Creek), cardstock (CTMH)


I started with a 3 1/2" x 5" piece of yupo paper which I covered with alcohol blending solution and added drops of Citrus, Pool, and Turquoise alcohol inks in three rows from bottom to the top tilting the card to move the colours around. Once dry, I placed a green foiling sheet over top and burnished it onto the yupo background. Once peeled away, it sticks bits of foil to some of the tacky areas on the background.  


From there, I stamped the Spring Silhouette Flowers with Black Soot Archival ink. Next, I adhered the panel to a white card base. Then, I added the white acrylic painted "You Rock" chipboard sentiment using the Mini Alphabet chipboard letters and added some green foiling to them. Lastly, to complete the card, I glued on some tiny stones along the bottom of the panel.

If you give this technique or silhouette stamp a try, be sure to share it with me.

TTFN,

*****

Magenta products used:


Mini Alphabet 6 X 6 Chipboard Letters

Thursday, June 14, 2018

Magenta Magical Silhouettes


Today folks, I have a card that I created for Magenta. This one is a foiled alcohol ink card made on Yupo using the beautiful Magenta Spring Silhouette Flowers stamp that I am so fond of from the Spring release.


Supplies: Spring Silhouette Flowers and sentiment stamp (Magenta), Yupo Paper (Yupo), Tim Holtz Amethyst, Turquoise & Pool Alcohol Inks and Blending Solution, Jet Black Archival Ink (Ranger), Bora Bora Turquoise foil (Prima), VersaMark ink (Tsukineko), fine white embossing powder (Simon Says Stamp), white paint marker (Sharpie), white cardstock (CTMH)


I started with a 3 1/2" x 5" piece of yupo paper which I covered with alcohol blending solution and added drops of Amethyst, Turquoise, and Pool alcohol inks in three rows from bottom to the top. Once dry, I placed a turquoise foiling sheet over top and burnished it onto the yupo background. Once peeled away, it sticks bits of foil to some of the tacky areas on the background. 


From there, I stamped the Spring Silhouette Flowers with white pigment onto the background and white heat emboss powder. You have to be very careful with yupo and heating it as it can warp so do so with a very warmed up heat gun from the furthest distance away to heat the emboss powder as possible. Next, after edging the border with a white paint marker, I adhered the panel to a white card base. Lastly, to complete the card, I stamped the sentiment under the panel.


I love how vivid the background is with the alcohol ink and the foiling just adds more interest and panache. I hope you are inspired to give it a try.


TTFN,


*****

Magenta products used: