Pages

Wednesday, July 31, 2019

Mini Notes of Thanks


Those that follow me might have noticed that I tend to make a lot of thank you cards as I am a believer in showing kindness and appreciation and that I tend to not make standard sized cards. I create for the sized area that I need to based on my idea or the scale size of the products used. This leads to a copious amount of various sized widths of cardstock strips. So I like to find ways to use up this stash and other various odds and sods from previous projects. Besides making ATCs, another way I have found that works well is to make cheery little mini cards of thanks. I have found that these mini gems always illicit a surprised delightful reaction from the receipt both for their novel size and cuteness factor.


Supplies: Apple Blosson Bouquet stamp, Mango Tango and Grass Green Nuance (Magenta), Tim Holtz script stamp (Stampers Anonymous), Vegas Gold and Irridecent embossing powder (Emerald Creek Craft Supplies), Thanks Script Die (Simon Says Stamp), black cardstock (Bazzill), vellum (The Paper Company), white cardstock and coffee filter (misc.)

The background was heat embossed stamped with Emerald Creek Vegas Gold emboss powder using a Tim Holt script stamp and splattered with Magenta Mango Tango Nuance. The sentiment is a multi layered die cut from Simon Says Stamp Script Thanks.


The flowers were created by iridecent heat emboss stamping on a coffee filter. To make the flowers, you will need a coffee filter and flower image stamp. On this card, I used the Magenta Apple Blossom Bouquet stamp. Load the stamp with VersaMark ink and stamp it onto the coffee filter. Here, I stamped the image four times prior to adding fine Iridescent glitter embossing powder. This will give you lots of extras for future projects. Once it is heat set, the emboss powder saturates the filter fibres and creates a perfect barrier for watercolouring.


Next, place the filter on a craft mat and spritz it with water so that it is fully saturated. Then, carefully pop the lid off the colour of Nuance that you wish to use (I used Magenta Mango Tango Nuance). Wet your paint brush and then pick up just a little bit of Nuance powder on the tip of the brush.


The colours are extremely concentrated and a little goes a long way. Start in the centre of the flower and dab the colour on, letting the water carry it to the edges. Add more spritzes of water and dab colour as needed to help move it and get the colour intensity that you want. Then, let it dry... either naturally or you could use a either a heat tool at a distance or a blow dryer on warm & low setting. Fussy cut the coloured flowers and use as you wish. They can be used singlely, like I did on this card, or you could even layer them up for a more dimensional flower. I added leaves which were free hand painted with Grass Green Nuance on vellum and then fussy cut when dry.

I am entering this card into Simon Say Stamp Monday Bright and Cheerful Challenge and Simon Says Stamp Flickr Challenge #128 - Anything Goes.

I don't always blog about smaller fast makes here on my blog. I did share these next two earlier this month on my IG account as part of Kathy Rac's 30 Days of Colouring and World Watercolouring Month. These are also 3 x 3" cards made from left over cardstock and watercolour paper (hence the different whites).


They are clear heat embossed stamped with a Close to My Heart mini stamp and painted with Kuretake Zig Gansai Tambi watercolours.

I hope you have been inspired to use up some scraps in make bright cheery cards to bring a smile to someone's day. Be sure to share in the comment or tag me on social media if you do.


TTFN,


Tuesday, July 30, 2019

Florals and Foil


I finally got my hands on some Altenew products and decided to play along with their July Inspiration Challenge. To colour this one, I went with watercolour to keep up my watercolouring for World Watercolour Month.


I used the Altenew Floral Drape stencil with a mini mister and Mijello Mission Gold watercolour paints on Strathmore 400 series watercolour paper. Once dry, I added some gold splatters with Gold Sheer Shimmer Spritz and then, I used a gluestick along the bottom and added gold foil flakes. Lastly, I gold heat emboss stamped the sentiment with the Altenew mini Hello stamp.

Here you can see the challenge image:


Be sure to check out the challenge post here for an inspirational video for the beautiful watercolour card by Therese Calvird.

TTFN,

Happy Thoughts Magenta Bookmark


With summer vacation, comes time to read and I found that I was in need of a new bookmark so I decided to make some new ones. Today, I am up on the Magenta blog with this mixed media book mark. I used a combination of textures and techniques... gold leaf with a stencil on muslin, emboss resist watercolouring an ATC coin sized flower, and bringing it all together with stitching... in creating this one.


I started by clear heat emboss stamping the smaller Rose Canina stamp on Canson XL watercolour paper and watercolouring it with Rose, Citrus and Paradise Prima Pastel Dreams Confections watercolours. Once it was dry, I used a 2 1/2" circle punch to cut it out.


Next, I cut a 3 x 6 3/4" piece of kraft paper and used my favourite Script and Postmark stamp with VersaMark ink to completetly stamp the entire length of the base.


Then, I cut a 2 1/2" x 6" piece of muslin and removed thread strands to distress it. Next, I used Cosmic Shimmer glue through the Large Old Lace stencil applying it with a small stiff bristle brush. Once it was set, I added the gold leaf and used a brush to burnish and clean it off revealing the guilded areas. (Tip: Using a waffled/grooved static sheet like a Swiffer sheet helps clean up the fly away small bits of gold so that it doesn't get everywhere.)


Then, I white heat emboss stamped the "happy thoughts" part of the Think Happy Thoughts stamp on black cardstock. Now that I had all the parts, I was ready to tack them down with a little gel medium so that I could sew them together.


Supplies: stencil and stamps (Magenta), craft cardstock (CTMH), XL watercolour paper (Canson), Pastel Dreams Watercolour Confections (Prima), VersaMark ink (Tsukineko), clear and white embossing powder (Simon Says Stamp), black cardstock (Bazzill), 2 1/2" circle punch (Stampin' Up), Cosmic Shimmer Foil & Glitter Glue (Creative Expressions), muslin, goldleaf, thread (misc.)


I love the shine of the foil, the feel of the fabric and the softness of the watercoloured flower. This is sure to make me smile everytime I use it. Yes, happy thoughts indeed!


TTFN,

*****

Magenta products used:

Saturday, July 20, 2019

Explore - Mixed Media ICAD


Today's creation has me keeping up my participation in Daisy Yellow's ICAD 2019 and World Watercolor Month by incorporating both in it. This 4 x 6" mixed media ICAD was inspired by the Our Mixed Media Moods June moodboard and Creative Embellishments July Color Challenge with a Twist - Clouds or Waves (I went with waves). I included the graphics at the end of the post.


I went with a fairly literal interpretation of the inspiration boards choosing elements directly from the images. My colour medium of choice for this project was Dina Wakley Scribble Sticks and Heavy Body Acrylic paint.


I chose a piece of Studio Light Denim Saturdays pattern paper just for this project as it went with the grey boards from the centre bottom of the moodboard. It reminds me of an aged cedar dock. I cut it to the 4x6" size and adhered it to the index card with Multi Medium Matte and then did a layer of the gel on the front also. Once it was dry, I covered the card with clear gesso, creating a texture with a brush to start the look of waves. Once dry, I then took a piece of white oil pastel and drew on waves. Next, I scribbled the Dina Wakley Scrbble sticks onto the craft mat and then used the water brush to blend and paint with the colours. Once I had the base colour, I then used a smooshing technique by picking up colour of the mat with the index card. This gives a splashy motled effect. After it was dry, I buffed directly over and following the the pastel lines to bring back the whiteness and contrast of the wave lines. I darkened the edges first with Night acrylic paint but found it was a tad on the purple side against the wave's colour so added Marine to bring up the blue tone.


Next, I turned my attention to the cardboard piece. The base of this was pre-made while I was making my Live Gently Upon This Earth ATC (You can see it here). Thus, the cardboard already had the dictionary page adhered to it and it was covered with gesso and left over Clear Rock Candy Crackle paint. I just needed to give it colour which I did using the Marine Scribble Stick and a waterbrush. While it was drying, I used my finger to add some Texture Paste to the Creative Embellishments Nautical Compass chipboard and then sponged on the Night acrylic paint to it and the N. I chose solely the N as Canada is the north, cottaging is north, and north is where I most spend time by a lake. Once they were dry, I adhered them to the cardboard piece.


Next, I created the the blueberries. Blueberries grow along the rocky shore areas at the cottage in Muskoka so I went with a handrawn watercoloured sprig of them. I have to say that I am quite proud of myself for how the sprig turned out. I watercolour layered the leaves starting with a wash of Evergreen, giving them a blueish colour with Marine and Night, and then darking them with Brown. The branches went through the same layering but I included the addition of Black as the final layer. The berries were painted with two layers of Marine and once I was happy with each one, I added a tich of black to darken the released spent flower area. Once they were dry, I fussy cut them. Then, I was ready to assemble the project.


To assemble the piece, I wrapped the cardboard with navy wire (for the bottom right image on the OMMM moodboard) and then used gel medium to adhere it off centre, more to the left, on the index card base. Then, I tucked in the blueberry sprig and glued it with with the gel. Next, I stamped the CTMH Explore (from their Adventure stamp set) onto a piece of transparency with Black StazOn ink. After trimming it down, I tried it out on the cardboard but it was getting lost as that area was rather dark so I backed it with a small piece of gessoed and Marine coloured dictionary paper prior to adhering it to the cardboard. 

I included some detailed close ups of the top and bottom sections.


With this one, you can better see the crackle paste on the dictionary text areas as well as the texture on the compass rose.


With this one, you can better see the splattery splotches of colour on the index card background, the wire, and the Explore transparency.


Here's a last look at the entire finished ICAD.


Supplies: index card and transparency (Staples), patterned paper (StudioLight), Marine, Night, Evergreen, Brown and Black Dina Wakley Scribble Sticks, Night and Marine Dina Wakley Acrylic Paint, Multi Medium Matte gel, Tim Holtz Clear Rock Candy Crackle Paint, Texture Paste (Ranger), Nautical Compass chipboard (Creative Embellishments), clear and white gesso (Liquitex), XL watercolour paper (Canson), Explore stamp (CTMH), Black StazOn (Tsukineko), white oil pastel and wire (Dollarama), cardboard and dictionary page (misc.)


I hope I have inspired you to give one of the many different techniques that I used a try. As mentioned at the top of the post, here are the mood board and color board that were my inspiration for this project. You can read more about each challenge and see their inspirational creations by clicking on the images below.


As today's creation is a mixed media piece, I am also joining in over at Bleeding Art July Anything Goes Challenge.


Bleeding Art


TTFN,


Sunday, July 14, 2019

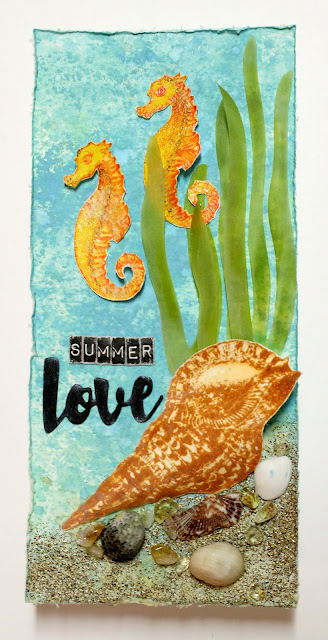
Summer Love


Sometimes you create something and then you are just so excited and tickled pink about how it turned out. Such is the case with the panel that I am sharing today. Continuing my support of World Watercolour Month, I used inks as my medium to watercolour. My theme inspiration came from Simon Says Stamp's Monday Life on the Ocean Waves challenge.


I started with a 3 1/2 x 7 1/2" piece of Canson XL watercolour paper and Tim Holtz Distress Ink Oxides in Cracked Pistachio and Broken China. I used the smooched ink on a craft sheet and spritzed with water technique, drying between layers and going back in until I was happy with the results. Next, I splattered it with water, then Broken China and Salty Ocean Distress ink each mixed with water adding depth and layering going for a watery effect. I had left partial white patches on the bottom right corner. There, I used Brush Corduroy with mat water smooshing and a water brush to add splatters to give the area a sand colour. Once dry, I used the Ranger Emboss It dabber to dab little bits and heat embossing with Seth Apter's Dirty Sand Baked Textures made by Emerald Creek added bits and heating layering until I was happy with it.


While the panel was drying, I started creating the other element. I watercolour stamped and waterbrushed the Emerald Creek Conch shell onto watercolour paper with Dried Marigold. Once dry, I stamped it with water spritzed Tea Dye. Once that was dry, I restamped the image with VersaMark and heat embossed it with SSS Fine Clear emboss powder. After fussy cutting it, I brushed some water on the back and shaped it over a glue stick.

Next, I turned to the crafting of the sea horses using an Emerald Creek. They were made by water spritz stamping with Mustard Seed Distress ink onto watercolour paper. I moved the colour around with a waterbrush. Then, water spritz stamping with Worn Lipstick, added to certain parts. Once dry, I again stamped with some area of the image inked with Worn Lipstick. Then, I restamped the image with VersaMark ink and heat embossed with Fine Clear emboss powder and added touches of brown Stabillo All prior to fussy cutting them.


Next, I turned to the creation of the seaweed which I free hand cut from vellum and coloured with by swiping Shabby Shutters Distress ink on both sides. Then, I added small touch swipes of Crushed Olive and Peeled Paint spreading and blending it with my finger. Once dry, to make them come to life, I shaped them with twists and curls. 

After adhering the conch shell and seaweed, I used Mutil Medium Matte gel and glued on some Emerald Creek Shoreline shells and Citrine Gemstones. While it was drying, I die cut the Love from the SSS I Love You Brush Script die. After gluing layers together, and distressing it by dry brushing it with Sharpie white paint from a paint marker, I glued it in place. I sanded the Tim Holtz Label Letters as I spelled out and adheres the "summer" part. Lastly, I distressed the edges to frame in the scene.


I hope you enjoy this panel as much as I do. Be sure to check out the other inspirational pieces created by the DT's at Simon Says Stamp Monday Life On The Ocean WavesI am also entering this into Craft Stamper Magazine's July Take It, Make It Anything Goes Challenge here along with Simon Says Stamp's IG July Watercolour Challenge and Flickr Group Split, Splat, Splatter Challenge #127

TTFN,


Friday, July 12, 2019

Christmas in July Blog Hop


Welcome to the next stop on the Christmas in July Hop! The crafty mixed media elves have been busy fashioning inspirational seasonal creations. Sit back, relax and curate some crafty Christmas creations. 


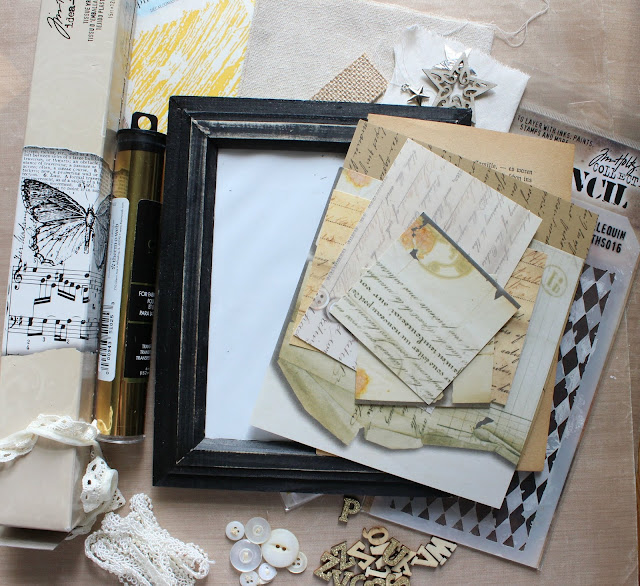
Cassandra here, joining in the hop with this mixed media canvas that I created from a variety of upcycled materials (a Shreddies cereal box board, corrugated pizza liner, kraft paper packaging from a purchase at my local scrapbook store, vintage mother of pearl buttons that I purchased at auction years ago, and vintage book paper from a book discarded from the library) along with some dollar store items (the frame, burlap tape, lace, gold glitter wood letters, linen square and vintage themed patterned paper). I also got to rummage through my crafty stash and use up some things that I have had for a while.


To begin, I gathered together a plethora of items that I thought might work for a vintage feel and picked from the pile as I went along. I started by cutting the Shreddies cereal box board into a slightly smaller than a 5" x 7" panel. Then, I gave it a prep coat of gesso. Next, I picked out patterned papers, tissue papers (Tim Holtz and pre-stamped tan coloured tissue- both leftovers from previous projects) and old book paper.


Once I collaged them with Ranger Multi Media Matte gel and let them dry, I scrapped and brushed on some Golden gesso, lightening parts with a baby wipe. Using the gesso, I roughly delineated where the tree would be created.


Once dry, I used a Brown Stabilo All pencil, loosley scribbling around the edges and where there were collage seems. Then, I activated it with a water brush, adding in more as needed until I was happy with the look.


Next, came the trial and error part of building the tree. I tried a bunch of different combinations of pieces and different orders until I settled on this one.


Then, I adhered all the strips into place with either the matte gel or Sookwang Scor-Tape double sided adhesive. At this point, I thought I was done until I tried the panel in the frame and decided, it needed a bit more to the background.


I used a Crafty Individuals Harlequin stamp and a Nougat Stamper's Big Brush Marker to add in some diamond texture with a second generation (stamp off) technique to lighten the brown that transfered.

Here is another look at the finished canvas.


Supplies: patterned paper (K & Company, Nobility), Tim Holtz Ideaology Melange Tissue Wrap (Advantus), bird stamp (CTMH), gesso (Golden), Jet Archival Ink, Multi Medium Matte (Ranger), linen, lace, burlap tape, bordesticker, gold glitter wood letters and frame (Dollarama), Harlequin stamp (Crafty Individuals), Nougat Stamper's Big Brush marker (Faber-Castell), Brown All pencil (Stabilo), Shreddies cereal box board, German book page, tan tissue paper, aluminium foil, vintage mother of pearl buttons, kraft paper bag, corrugated Pizzaville box liner (Misc.)


I can't help but smile at the end result! I love it and look forward to enjoying this Christmas decor for years to come. I hope it brings you some joy too!

For your next stop on the Christmas in July hop, please head on over to Whimsy Chic Paper Crafts.


If you are just beginning on the Christmas in July Hop with your visit here on my blog, below is the full list of all the inspirational talented elves in hop order:


A big thank you goes out to Cathy Frailey (owner of Bleeding Art challenge blog) for organizing this hop. Be sure to visit all the hop stops for some fun Christmas themed mixed media creations and be sure to leave some love!


TTFN,


Tuesday, July 9, 2019

More Watercolour Stripes


Today's watercoloured cards were inspired by Simon Says Stamp Wednesday Challenge blog Stars and/or Stripes and Simon Says Stamp Flickr Challenge 127 Split, Splat, Splatter as I take part in Kathy Raccosin's the Daily Marker 30 Day coloring challenge and World Watercolour Month


I used the same design on Ranger watercolour paper for both cards mixing it up with different colours, sizes and sentiments. The watercoloured stripes and hearts were created with the Simon Says Stamp Brush Stroke Messages stamps using Tim Holtz Distress inks and spritzing them with water prior to stamping. After stamping with each colour, I used the colour left on the stamp and door of the Misti to add splatters of each colour. Both sentiments were first stamped with Tim Holtz Black Soot Archival ink and then heat embossed with SSS Clear Emboss Powder. To finish the cards, a little sparkle was added with SSS Assorted Moonshine sequins.


I love, love, love, how this cool colour card turned out. For the stripe colours from top to bottom, I used Twisted Citron, Cracked Pistachio, Mermaid Lagoon, Shaded Lilac, and Wilted Violet Tim Holtz Distress inks. The sentiment comes from a combination of the SSS Big Thanks Words stamp set and Winnie and Walter's The Big, The Bold and You for the "a bunch" part.


You can see the order of Tim Holtz Distress ink colours that I used for my rainbow version from the photo but for those who are small print challenged, they are: Mermaid Lagoon, Twisted Citron, Mustard Seed, Spiced Marmalade and Picked Raspberry. The You Are Loved sentiment comes from Simon's Brush Stroke Messsages.


I also created a third warm colour combo version but decided to hold it back for magazine submission. Fingers crossed that it gets picked up!

TTFN,


Monday, July 8, 2019

Shine Bright


It's a sunny summer day in my neck of the woods and I have another watercoloured card to share with you. Today's card was inspired by Simon Says Stamp Wednesday Challenge blog Stars and/or Stripes, Dina Wakley Media Tribe's July On the Lighter Side challenge and for Kathy Racossin's ongoing The Daily Marker 30 Day Coloring Challenge.


I used watercoloured strip leftovers painted with Mijello Mission Gold watercolours and trimmed from fussy cut leftovers from my Thanks card posted a few days ago here. They became my starting point as the stripes and I picked out the turquoise and bright green-yellow hues from them in chosing Dina Wakley Scribble sticks in Turquoise, Lime and Lemon to be my watercolouring medium of choice for this project. I used the Crafters Workshop Mini Twinkle Twinkle stencil with sponged on gesso to start the background and as I used each colour in colouring the stars, I splattered colour onto the base. The Dina Wakley Star Light stamped stars, along with using the Scribble sticks, were heat embossed with Emerald Creek Craft Supply's Vegas Gold sparkly emboss powder as well as I used the splattered dots inside of the stars to emboss stamp the splatters onto the background.


After fussy cutting out the stars, I adhered and popped up layers for dimension before finishing the card off with the white heat embossed stamped sentiment created from two of the Star Light set set words.

There is still time to join in any of the inspirational challenges, so check them out by clicking on their name below:


TTFN,