Pages

Showing posts with label stencils. Show all posts

Wednesday, July 15, 2020

Bleeding Art July Challenge - Fleur


Hi crafty friends! Today starts a new challenge month at the Bleeding Art Challenge Blog. As always it is an Anything Goes mixed media challenge. My Design Team inspiration creation for this month is a home decor canvas. I have a love of vintage things and even better if they are French inspired. This piece checks both boxes.


The background canvas was created with a layered resist technique using micro glaze and fluid acrylic paint. I started by covering the canvas with vintage collage medium. Next, I stenciled micro glaze through the Harlequin stencil and then sponged the whole canvas with slightly watered-down Emerald Fluid Acrylic. Once that was dry, I stenciled micro glaze through the Gothic stencil and sponged on watered-down Umber Fluid acrylic.


Once that was dry, I wiped off any residual micro glaze. I decided that the canvas needed some colour framing so I sponged on umber along the sides and edges and wiped some away as I went to keep with the distressed look.


Supplies: Canvas and metal letters (Dollarama), Tim Holtz Harlequin and Gothic Stencils (Stampers Anonymous), Vintage Distress Collage Medium, Distress Micro Glaze, Gold Alcohol ink Mixative (Ranger), Finnabair Emerald and Umber Fluid Acrylic (Prima), fleur de lyse ornament (RAZ imports)

While that was drying, I brushed on some Gold Mixative Alcohol ink onto parts of the metal letters so as to match the touches of gold on the fleur de lyse. Once all was dry, I adhered the fleur de lyse and metal letters to the canvas and called it done.

Here's another look at the completed canvas:


Head on over to the Bleeding Art Challenge Blog here to see my fellow DTs' inspirational pieces and get details on entering the challenge.

TTFN,

Monday, June 29, 2020

Cheers! ~ You Are Awesome


Hello Crafty Friends! Summer is here and it's time to cheer. I am up on the Magenta blog today sharing a celebratory shaker card. This sparkly one works for birthdays, graduations, retirements, job promotions, etc. Any occasion where you would say... Cheers!


Supplies: Cheers stamp, You are Awesome stamp, Rose Window Stencil, patterned paper (Magenta), Super Stock cardstock (Creative Scrapbooker Magazine), Tim Holtz Distress Inks, Black Soot Archival ink, Glossy Accents (Ranger), VersaMark ink (Tsukineko), Midnight Black emboss powder (Emerald Creek), black glitter (Doodlebug), Assorted Moonshine Sequins (Simon Says Stamp), orange Baker's Twine (Maya Road), round shell packaging (Misc.)

I blended a selection of Tim Holtz Distress inks through the Rose Window stencil for the background and heat emboss stamped the Magenta Cheers with a combo of black glitter mixed with black emboss powder. I up-cycled a circular shell packaging piece with Simon Says Stamps Assorted Moonshine Sequins for the shaker part. The top layer is the "B" side of the Victorian Beauty patterned paper wrapped with orange Maya Road Baker's Twine and tied with a You Are Awesome stamped tag made from Peacock Blue patterned paper with distressed edges.

TTFN,


*****
Magenta products used:

TM263 Rose Window
Rose Window Stencil
Cheers!
You are Awesome
ME164 Victorian Beauty - 10 sheets
Victorian Beauty Patterned Paper
ME216 Peacock Blue - 10 sheets
Peacock Blue Patterned Paper

*****

Friday, June 19, 2020

Steampunk Blog Hop


***UPDATED July 5th: Bookmark and ATC giveaway is closed.

Winners are Penny -Bookmark & Elle - ATC. Congrats ladies! Please send me your mailing info so I can get these out to each of you.***

***UPDATE June 23rd: Commenting for Blog Hop prizes has ended. Commenting for my bookmark and ATC giveaway is open until Saturday, July 4th at 11:59 PM.***

Welcome, crafty enthusiasts! It's blog hop time with a spectacular array of steampunk creations with sixteen sponsored prizes up for grabs. My contribution to this sojourn is themed Sea, Land, & Air as I join in with a steampunk inspired bookmark and ATC.


The bookmark base is made from water spritzed and crinkled kraft cardstock topped with Stamperia Mechanical Sea World patterned papers including the glossy accent embellished fussy cut seahorse.


Some distressing with Tim Holtz Distress inks, chipboard gears from Creative Embellishments and cut out letters/words from the Mechanical Sea Worlds packaging completes the main part of the "Free to be Me" bookmark in order for it to maintain its functionality as an actual bookmark. Where I had more freedom to add dimensional pieces was with the "ribbon & charm" part that hangs outside of a book.


Supplies: Mechanical Sea World patterned papers (Stamperia), kraft carstock (CTMH), Glossy Accents, Walnut Stain Tim Holtz Distress Ink, Distress Collage Medium (Ranger), mini gear chipboards (Creative Embellishments), Cerith Seashell Stamp, Ancient Anchor Charm (Emerald Creek Craft Supplies), Timber Brown StazOn inks (Tsukineko), Shrink-It (Aleene's), Natural Hemp Cord (Darice), Tim Holtz Idea-ology Jump Rings (Advantus), glass beads (Misc.)

For that, I used hemp cord tied with glassbeads, a shrink plastic seashell stamped with the Emerald Creek Cerith Seashell stamp and an alcohol ink coloured anchor embellishment. I am so pleased with how this came together and that it is perfect for a steampunk enthusiast's use in a practical way.

Up next is this little up-cycled gem of an ATC. I like to reuse/repurpose what I can in art pieces and this one incorporates corrugated cardboard and shell plastic packaging as key elements in its design. It was an add-on item to my initial intention of just having the bookmark as a stand alone piece for this hop. As I waited for the hop day I wanted to make something that expressed the current world wide reflection of the status quo situation and came up with this. 


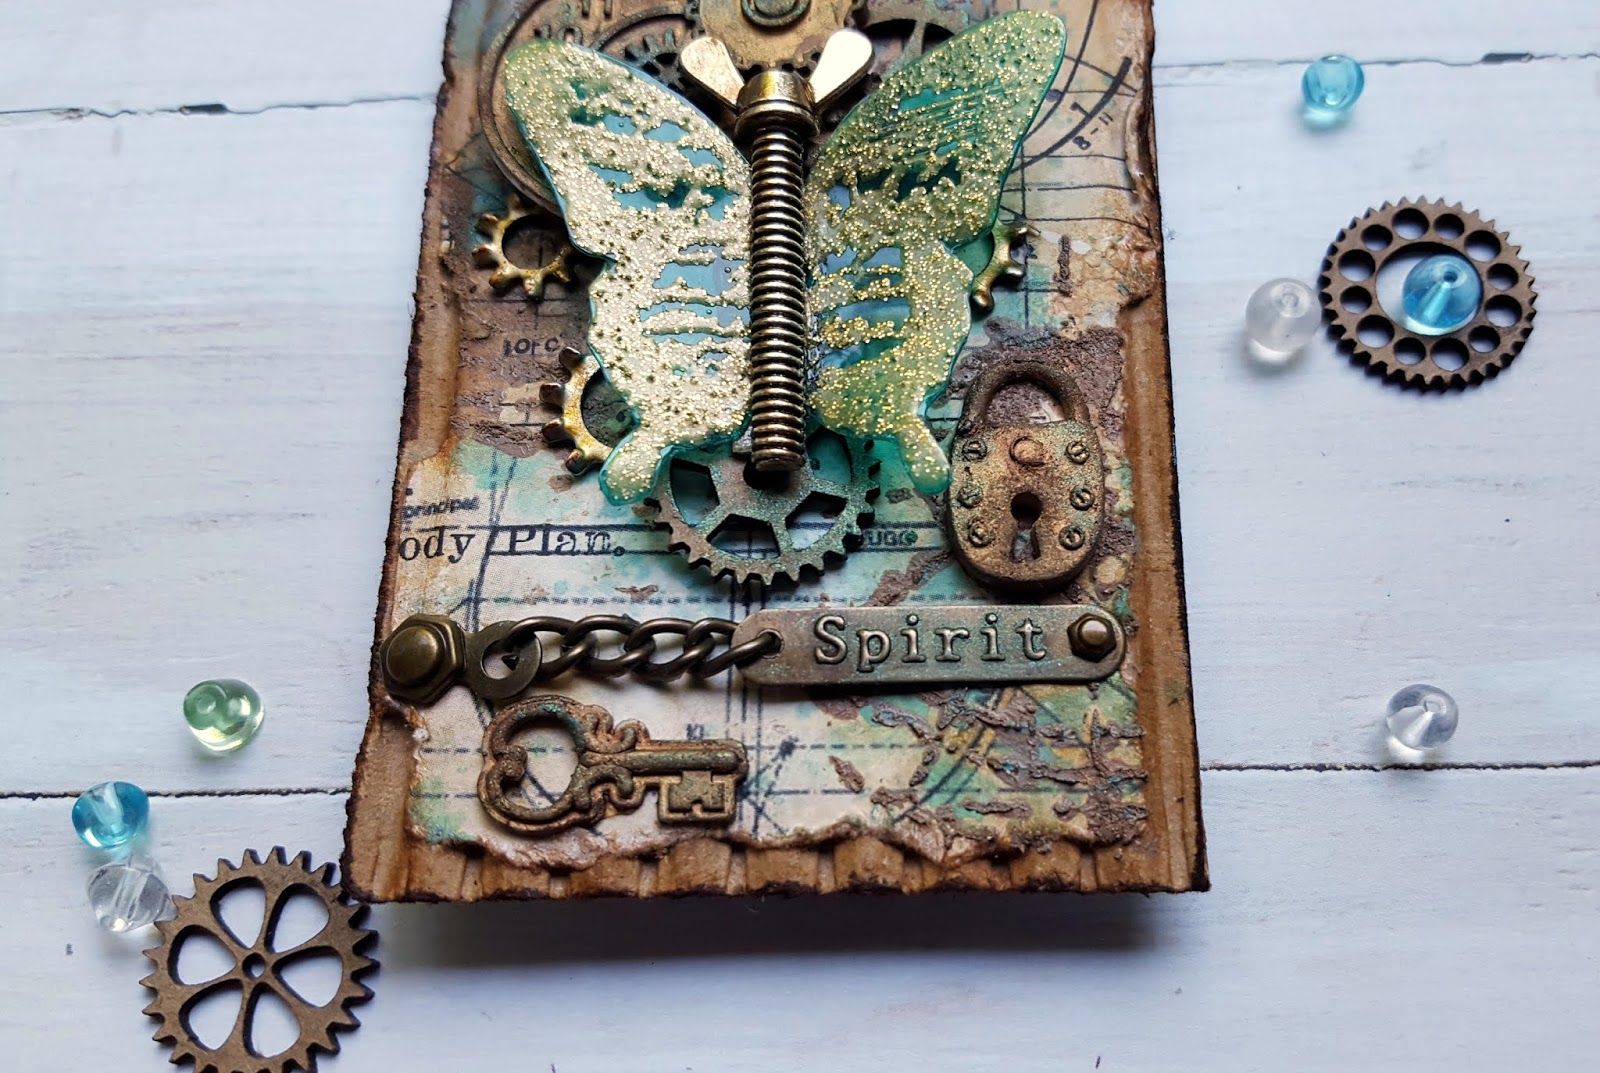
The "Unlock the Spirit of Change" ATC starts with a base piece of corrugated expose cardboard topped with a distressed piece of the Stamperia Mechanical Sea World patterned paper. After splattering it with Broken China Distress ink and Vintage Photo Distress inking the edges, I applied Tim Holtz Grit Paste mixed with Burnt Sienna Finnabair Fluid Acrylics through the Crafter's Workshop Mini Specimens stencil.


Supplies: Mechanical Sea World pattern paper (Stamperia), Mini Specimens stencil (The Crafter's Workshop), Finnabair Burnt Sienna Liquid acrylic, Mermaid Teal acrylic paint, Lucky Emerald Antique Brilliance, Ingvild Blome Stamp-N-Add Butterfly Wings (Prima), Tim Holtz Distress Grit Paste, Distress Collage Medium, Broken China, Vintage Photo and Ground Espresso Distress ink, Patina, Pool and Express Alcohol ink, Gold Mixative, Glossy Accents (Rangers), mini gears chipboard (Creative Embellishments), Mod Podge Industrial molds (Plaid), VersaMark ink (Tsukineko), Vega Gold emboss powder (Emerald Creek), Spirit metal tag (Dollarama), Tim Holtz Ideaology Hex Fasteners (Advantus), metal washer (Home Depot), cardboard and plastic packaging (Misc.)

On top of that is a collection of Creative Embellishments Mini Gears chipboard, Industrial Mod Podge molded gears, lock and key coloured with a combination of alcohol inks and Finnabair paint and wax. The butterfly was created from left over plastic shell packaging coloured with Patina and Pool alcohol inks and then heat embossed stamped with a Prima butterfly using Emerald Creeks Vegas Gold Emboss powder. The butterfly is mechanized with an alcohol ink coloured Prima metal wing screw embellishment hopefully giving the illusion that it is wound to fly as it is set free. There is much symbolism in this piece with elements purposely chosen that marry themselves well to express the message through a steampunk theme.

Now onto the give away part...


As for my blog's giveaway... it is both of these creations. Yes, you can become the owner of one of these crafty creations and yes, I am willing to snail mail them internationally so two lucky people can enjoy them. To be entered into my blog's Sea, Land and Air giveaway draw, you simply have to complete these two steps:


  1. Be a follower of my blog or my IG account here or become a follower of either and 
  2. Leave a comment below on this post stating which you would like to win e.g. ATC, bookmark, or either one.


My blog giveaway ends Saturday, July 4th at 11:59 PM. Please note that this is a different timeline than the Steampunk blog hop sponsored prizes which ends Monday, June 22nd.

As for a chance to win one of the 16 sponsored prizes for our Steampunk Hop - we're proud to say these are small businesses run by artists. Let's show them some love!
1) A Vintage Girl - $20 prize package
2) Angel Dream Crafts - $20 gift certificate (shipping not included)
3) Linda Israel Art - $50 gift certificate (shipping not included)
4) A Matter of Crafts - $20 gift certificate (shipping not included)
5) Expressions Craft - $25 gift certificate (shipping not included)
6) Nellys Artistic Creations - original artwork (see link for examples of her work)
7) Gecko Galz - $25 in digital products
8) Creative Embellishments - $50 (shipping not included)
9) Emerald Creek - $25 gift certificate
10) Electric Pandemonium - choose a $45 original artwork piece (shipping not included)
11) Thompson's Craft Supplies £20 (approx $25) (shipping not included)
12) It's Oddly Appealing - original artwork (see link for examples of her work)
13) The Funkie Junkie Boutique - $25 gift certificate
14) Hobbilicious - £15 (approx $19) (UK shipping free)
15) ITD - prize package worth £25
16) Stamperia - a pizza box prize pack

To have a chance of winning one of the 16 coveted prizes, leave a comment on this post, along with your email address or social media contact (IG, FB, etc) and what country you're from, from now through Monday, June 22nd. Sixteen winners will be picked randomly from all comments left from all of the artist's participating! The winners will be contacted via email/social media so it's important you leave your address/social media contact! Good luck and enjoy the hop!

For your next stop on the Steampunk hop, please head on over to Monica Longard's MonDo Creations.


If you are just beginning the Steampunk Blog Hop with your visit here on my blog, below is the full list of all the inspirational talented makers:
A big thank you goes out to Cathy Frailey (owner of Bleeding Art challenge blog and the coming in September Steampunk Challenge blog) for organizing this hop. Be sure to visit all the hop stops for some fun mixed media steampunk creations and be sure to leave some love!

TTFN,

Thursday, April 16, 2020

A Mother's Love - Guest for the Funkie Junkie Challenge


Hi crafty friends! Today, I am delighted to be sharing a shabby chic card as a Guest Designer over at the Funkie Junkie Boutique Blog for their newest challenge.


I was excited when I learnt that Sarah Emily's theme for this challenge was a Mother's Love.... perfect for a shabby play with Prima pretties using the Apricot Honey collectionI started with a 6" x 4 3/4" piece of the B side of "Tiny Blossoms" patterned paper applied Ranger Opaque Crackle Paste through the Finnabair Tapestry stencil. I then turned to the Prima mold created lock embellishment by brushing on Finnabair heavy white gesso


I love up-cycling - finding ways to reuse or re-purpose things in my creations. You might be surprised to learn that I created the lock embellishment from a fiber drink cup holder tray. You can find out how I did that in this post here


While both pieces were drying, I began fussy cutting flowers from the "Tiny Blossoms" & "Apricot Honey" patterned paper. Once the paste had dried and done its crackle thing, I added Rose Prima Pastel Confections watercolour paint. When I was happy with the colour density and look, I finished the panel with paint splatters. Using my finger, I dipped it into my watercolouring water, and then picked up some of the Lemonade watercolour paint and dabbed it onto select parts of the gessoed lock embellishment giving it a pretty shabby distressed look. Then, I once again turned my attention back to more fussy cutting along with cutting out a mini card from the "Happiness looks good on you" paper and distressing its edges.


With everything dry, I was ready to start assembling. First, I distressed the edges of the panel and them adhered it to a 6 1/4" x 5" white card base.


Next, I used scrap pieces of cereal box board and glued them down in the centre. Then, on top of that, I arranged and adhered the a layer of the fussy cut flowers along the edges to pop them up a bit for added dimension.


Next, I adhered two more layers of box board to the back of the distressed Love card and glued it into the centre. I filled in any areas with scrap pieces of flowers and leaves. Then, I adhered the lock embellishment, the AC Thickers "Be Kind" rose gold foam glitter letters, the bitty butterfly and added pink tiny glass beads along the edges of the Love card and called it done.


I was so happy with the results! It was such a pleasure to make this card and I want to thank the design team for having me join in. I hope you all enjoyed my take on the challenge and that it inspires you to get messy and create. Here's another look at my completed card.


You can head on over and leave some love on my Guest Designer post here and you can get the challenge details and link up an entry here.

Stay safe and happy crafting!


TTFN,


Sunday, April 12, 2020

Texture Filled Tag


If you are like me, you have a stash of started projects. You know those ones that you start, then put aside as more pressing projects come along. Today's tag fits that bill. I had started it for one of Tim Holtz Tag challenges eons ago but hand not finished it. It was bagged up and put in a drawer with the background completed but it still needed all the embellishment details and words added. This week's Simon Says Stamp Monday - Add Some Texture challenge was the perfect time to dig it out and finish it off as it is chock full of various textures.


The burlap base was stenciled with texture paste and coloured with Distress Ink. Next, I adhered the torn piece of patterned paper with gel medium. While that was setting up, I stamped the compass rose onto tissue paper. Then, I collaged it onto the background and inked the edges with distress ink.


Next, I took the scanned and printed photo of a family member and added colour to it to add interest, corner punched the corners and inked the edges. It didn't quite pop enough off the background so backed it with white cardstock. The crinkle ribbon was coloured with Antique Linen spray stain and adhered to the tag prior to adding the diecut, distressed and rolled cardstock flowers and leaves. Then, I adhered a piece of pattern paper to the back of a plastic fragment piece ad fashioned a paperclip into the whole and onto the metal Treasure pin clipping it onto the ribbon. Lastly, I inked the edges of the word strips and adhered them along with the crown and the metal initials and tided off the paper ribbon at the top.


It has been a while since I crafted with my collection of Tim Holtz products, and it was fun to play with them. You can't go wrong when you are inspired by Tim. I really like how this turned out and think it would be fun to make more tags along this vintage vein featuring other family members. Be sure to check out the design team creations over at the Simon Says Stamp Monday -Add Some Texture challenge here.


TTFN,


Monday, March 30, 2020

Spring is... Art Journal Page


Today, I am sharing some spring seasonal celebrating with an art journal page inspired by the Simon Says Stamp Monday Challenge Spring Mood Board and Kathy Raccosin's The Daily Marker 30 Day Coloring Challenge


Often, if I have an excess of a medium when crafting, I use it up on a blank page in an art journal or on an index card. For today's art journal, I started with just such a page where I had deposited the remaining modeling paste on a pre-gessoed page after applying it over the smallest Duo Flowers mask on this card. Because the Pebeo modeling paste that I had used was rather fluid (owing to its more plaster like texture), I had used the Duo Flower mask as a stamp pressing it down to transfer the paste getting multiple impressions with which I had created a design for future use. Thus, my starting point was to use the outside stencil piece of the mask, aligning it with my previously created impressions and using a Fuschia Inktense watercolour pencil crayon to outline each one.


Then, I activated the crayon by watercolouring each flower with Hot Pink Nuance. Once that was dry, I used the Flowers and Leaves stencil and a Teal Green Inktense watercolour pencil to add in the foliage around the flowers. I activated that crayon by watercolouring with Cerulean Blue Nuance and added a touch of Grass Green Nuance to each one. Next, I used an Apple Green Inktense watercolour pencil and free hand drew in leaves. I then activated those by watercolouring those with Grass Green Nuance. As they were drying, I dipped the watercolour pencil crayon into water and added the now activated Apple Green to the flower centres and darkened the leaves outlines and centre lines. Once all that was dry, I added a really watered down Bright Yellow Nuance to the background and dabbed it up with a paper towel to leave a subtle yellow.


To finish the page off, I added some splatters of Grass Green Nuance and used Copic Opaque White ink to add some further details to the flower centres and the leaves as well as to add splatters to the whole page. I ended up white heat embossing the edges after attempting to paint them with white acrylic paint that didn't really define them enough. Then, I muted the gloss of the emboss by painting over it with Matte Multi Medium Gel.


Lastly, I stamped the quote stamp on a strip of white cardstock with Black Soot Archival ink, trimmed it to size, distressed the edges, and adhered it to the page.

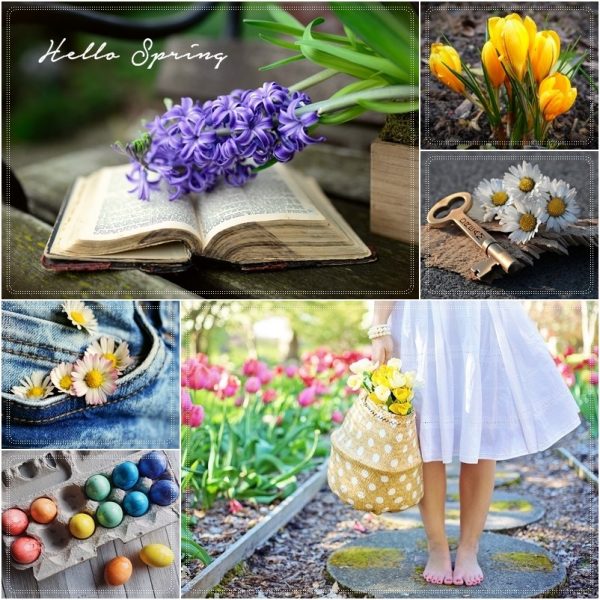
Here is the beautiful mood board put together by Simon Says Stamps Monday Challenge blog's Design Team member, Macarena.


You can check out the challenge details, see the inspirational seasonal creations from their design team, and see other participant entries here.


TTFN,


*****


Thinking of You


Today, I am up on the Magenta Blog sharing a card that I had created this month using a watercolour pencil crayon stencil trace and Nuance watercolour technique on watercolour paper to make its leaves background.


This card features a little Nuance watercolouring with emboss resist stamped coffee filter flowers. To learn how I created this card, head on over to the Magenta blog here

TTFN,


*****