Pages

Friday, July 10, 2020

Cattywampus


Oh my goodness, how fun is that word?! Say it with me... catty-wampus![ kat-ee-wom-puh s, kat-uh- ] LOL! Love it!

I had never heard of the word until Sara Emily posted it as a challenge on The Funkie Junkie Boutique BlogSarah quoted it as meaning..."appearing off center, diagonal from, crooked or not level, appearing askew, tilted or lopsided". She mentioned that it is something she hears around her home area in the Southern States.

It made me think of kitty-corner or catty-corner. I had the urge to look it up discern the origin... waywordradio.org had this, "We do know the word has been around for more than a century and is spelled many different ways, such as catawampus and caddywampus. It may derive from the Scots word wampish, meaning to “wriggle,” “twist,” or “swerve.”

This definition example from yourdictionary.com made me laugh because of the true to life picture it created in  my mind... "An example of something cattywampus are the positions of the items on the top of a coffee table after a two year old has been playing with them and moving them around."

Oh words are so much fun! Anyhow, I digress... on to the task at hand, sharing my Cattywampus creation!


I created an ICAD with my mind on using up one of my little bitty bobs baggies that I had curated a while back. Using multi medium matte, I collaged the index card with a dictionary page from the 'C' section where cattywampus would have been if it wasn't a simple affordable home dictionary from 1977 that I found for crafting use. Then, I applied scrapings of white gesso and once dry a little touch of clear gesso knowing that I was going to add watercolour on top. On my craft mat, I scribbled a good amount of Chocolate gelato and mixed it with glass bead glitter gel. I stenciled with it through the Crafter's Workshop Mini Damask stencil. I use the excess on another sized index card and what was left of the dictionary page. Once the gel was dry, I scrapped a bit of gesso to add some white bits to the damask. Once that was dry, I added on Vintage Pink Glimmer Mist with the nozzle tube end around the damask areas. Then, spritzed it with water and angled the card to get the colour to run. After it set up a bit, using the nozzle tube again, I added some splatters. While that was drying, I scraped some gesso onto the play word, edged it with a brown sharpie and distress inked it a bit. 


Next, I glued down the cheese cloth, lace, and old athletic tape all a bit cattywampus. I added the Create transparency and secured it with a mini brad and a few drops of Glossy Accents behind the 'A', 'T', and 'E'. I used a scrap bit of uneven dyed muslin to mat the corrugated play word and added the die cut butterfly slightly a skewed. Lastly, I added a second mini brad and a meandering brown craft wire for the final cattywampus touch.


Supplies: index card (Staples), glass bead glitter gel, Chocolate gelato (Faber-Castell), Vintage Pink Glimmer Mist (Tattered Angels), Mini Damask stencil (The Crafter's Workshop), Multi Medium Matte, Glossy Accents, Tim Holtz Vintage Photo Distress ink (Ranger), White and Clear Gesso (Liquitex), NoName cheesecloth (Loblaw's), circa 1977 dictionary page (Webster's Dictionary), brown marker (Sharpie), athletic tape, lace, Create transparency, corrugated Play word, die cut butterfly, craft wire (Misc.)


I had so much fun making this ICAD, that I decided to use up some other scrap bits and the pieces that I had used the leftover glass bead glitter glue on to make two ATCs for trading.


On this one, I added cheesecloth, spritzed kraft cardstock and old athletic tape and sewing it with a zig zag stitch with embroidery thread. I used a fussy cut Prima Apricot and Honey butterfly and pink craft wire for embellishments. The Magenta Make Time to Play was stamped with Black Soot Archival ink.


On this one, I first stamped the background with Finnabair Messy Writing stamp with Jet Black Archival ink. I added tan tissue, the spritzed kraft cardstock and lace. I fussy cut another Prima butterfly but it was too pale against the background so I watercoloured it with Bubblegum and Guava pink gelatos and added highlights and shading details with a Staedtler brown and white pencil  crayons and then outlined it all with a Stardust Gelly Roll pen for some sparkle.


Again, I added the pink wire and this time the Create title is a Tim Holtz rub on.

If you are interested in trading one of these ATCs, just let me know in the comments below.


TTFN,


Tuesday, July 7, 2020

Time to Create


Vacation time for me equals crafty time but that doesn't just mean creating. It's funny because I am bursting with ideas having spent the past couple of days catching up on crafty sites, checking out the challenges out there and doing a little retail therapy (not that I needed a nudge but a holiday ale helped out). Now, all I want to do is immerse myself and create, create, create.

Today's share for Kathy Raccosin's the Daily Marker 30 Day Color challenge and World Watercolour Month is a watercolour card inspired by the Color Throwdown #600 colour combo and Simon Says Stamp Flickr Challenge #153 Crazy For Coloring


Supplies: XL watercolour paper (Canson), Zig Gansai Tambi watercolours (Kuretake), Wonky Rectangles die and Fine Clear Embossing Powder (Simon Says Stamp), Merci stamp (Magenta), IO Beauty Text Cover a Card Stamp (Impression Obsession), Black Soot Archival ink (Ranger), black cardstock (Bazzill), pencil crayons (Staedtler), jewels (Offray)

I haven't painted loose floral roses in a bit and thought to give it a go with my Gansai Tambi watercolours on Canson XL. I did some experimenting with 2nd layer wet on dry painting. I wasn't thrilled with the results but thought... waste not, want not... how can I salvage it and use it for a card? Simon Says Stamp Wonky Rectangle die to the rescue. It was the perfect size to capture a part of my freestyle painting and give it a finishing detailed look. After heat emboss stamping the Merci sentiment, I thought it still needed something. Thinking of Kathy's recommendation of adding depth and details with pencil crayon, hand me taking out my pencil crayons. I went to work adding in some shading, defining some of the buds details, increasing the colour on the leaf veins, and adding a white halo outline to the Merci. Once I was pleased with the look, I matted the die cut panel onto black cardstock and then popped it up with cereal box board pieces onto a cardbase stamped with IO's Beauty Text background stamp using Black Soot Archival Ink. Lastly, I added some small jewels and called it done.

Here is the colour inspiration image:


If you are on Flickr, check out the other Simon Says Stamp Challenge #153 Crazy for Coloring cards.

TTFN,

Monday, July 6, 2020

A Good Reminder


Now that I have started my vacation time, being mindful is what I need right now as I attempt to unwind. Today's index card for ICAD2020 is a reminder that the first step is to... just breathe. That slow deep breath does wonders to calm a tense body and spinning mind.


Creating helps me be mindful. I am a slow crafter. I like to take my time as I create. I find the process relaxing and a sense of joy and fulfillment when I create something that didn't exist until I created it. 

For this mixed media index card, my colour medium as I join in Kathy Raccosin's the Daily Marker 30 Day Color Challenge is both watercolour and acrylic. As to the colours, I was inspired by the rich emerald gem tones of the Mixed Media Place's June Moodboard. When I saw the colours it reminded me of a pretty baby wipe that I had saved after creating an ICAD with those colours from a previous year. When you think of watercolouring, upcyling a baby wipe used in cleaning up watercolour splattering likely doesn't come to mind but I thought that it would make a great base for what I had in mind and keep me on track for World Watercolour Month. Think of the background like a watercolour abstract painting. The watercolours came from the lots of splatters using Prima Watercolour Confections from the Classics and Tropicals sets when I created this previous background.


To start, the index card base was stamped with a Prima background stamp, blended with a blend of Tim Holtz Vintage Photo and Walnut Stain Distress ink along distressing the edges and then edging it with Distress Ink. After adhering the baby wipe with Matte Multimedium Gell and letting it dry, I used a Brown Stabilo All watercolour pencil dipped in water to draw my leaf sprig. Once that was dry, I took it to my sewing machine and used embroidery thread to outline the sprig. Next, I switched up the thread to a more common standard weight brown multipurpose thread and stitched around the outside adding in some zigzag stitches for rule of 3 and framing interest.

Once back at my craft table, I stamped the Finnabair Messy Writing onto it with Coffee Archival Ink. Initially I thought I would be done at that point, but looking at it, I felt the leaves needed to stand out more so I painted the lower part with Finnabair Mermaid Teal Metallique paint and dabbing it off as I went to lighten and blend it. Next, I painted the top portions as highlighted areas with water-downed Finnabair Gesso. Again, dabbing off as I went to lighten and blend. I completed the painting part by added some tiny splatters of the gesso. Lastly, I distress inked the sentiment strip before adhering it with some cut pieces of cereal box board to pop it up for a little added dimension.

Here's a look at the ICAD again:


Supplies: Index card (Staples), IOD Text background stamp, Finnabair Messy Script stamp, Finnabair Mermaid Teal Metallique paint, gesso, Finnabair Sentiment sticker (Prima), Tim Holtz Vintage Photo and Walnut Stain Distress ink, Coffee Archival ink, Multi Medium Matte (Ranger), Brown All pencil (Stabilo), brown embroidery thread (Aurifil Mako'Ne), brown thread and baby wipe (misc.)

Here is the Mixed Media Place moodboard. Oh, so pretty!


I am also playing along with:

Mix It Up Challenge - #39 Anything Goes + Open Technique


TTFN,

Monday, June 29, 2020

Cheers! ~ You Are Awesome


Hello Crafty Friends! Summer is here and it's time to cheer. I am up on the Magenta blog today sharing a celebratory shaker card. This sparkly one works for birthdays, graduations, retirements, job promotions, etc. Any occasion where you would say... Cheers!


Supplies: Cheers stamp, You are Awesome stamp, Rose Window Stencil, patterned paper (Magenta), Super Stock cardstock (Creative Scrapbooker Magazine), Tim Holtz Distress Inks, Black Soot Archival ink, Glossy Accents (Ranger), VersaMark ink (Tsukineko), Midnight Black emboss powder (Emerald Creek), black glitter (Doodlebug), Assorted Moonshine Sequins (Simon Says Stamp), orange Baker's Twine (Maya Road), round shell packaging (Misc.)

I blended a selection of Tim Holtz Distress inks through the Rose Window stencil for the background and heat emboss stamped the Magenta Cheers with a combo of black glitter mixed with black emboss powder. I up-cycled a circular shell packaging piece with Simon Says Stamps Assorted Moonshine Sequins for the shaker part. The top layer is the "B" side of the Victorian Beauty patterned paper wrapped with orange Maya Road Baker's Twine and tied with a You Are Awesome stamped tag made from Peacock Blue patterned paper with distressed edges.

TTFN,


*****
Magenta products used:

TM263 Rose Window
Rose Window Stencil
Cheers!
You are Awesome
ME164 Victorian Beauty - 10 sheets
Victorian Beauty Patterned Paper
ME216 Peacock Blue - 10 sheets
Peacock Blue Patterned Paper

*****

Sunday, June 21, 2020

Mindset Matters - ICAD


Hello Crafty Peeps! I didn't think that I would get to start making an index card for ICAD2020 until I was finished school later this week as my life has been consumed with online learning but with having finished my last lesson planning for this week and faced with sweltering heat and patches of rain today, I thought to heck with it, I want to create. And so I did. So here is my creation inspired by Simon Says Stamps Monday Sprays and Splashes Challenge.


I have a ready stash of gessoed index cards so I started with that as the base and then scribbled on some Cheddar with a Dina Wakley Scribble Stick and activated it with a water brush. Then I sprayed it with water and let it run and also splatter it. Once that was dry, I did the same with a Peacock Scribble Stick but to a less extent so it was more of an accent colour. Once that was dry, I drew the branch in with a Stabilo All pencil and cut and collaged leaves from Dina Wakley printed tissue drawing around them also with the black pencil. Then I activated it with a brush and water smudging the lines and added design colour details to the centre of the branch.


Supplies: index card (Staples), Dina Wakley Cheddar and Peacock Scribble Sticks, Scribbly Small Birdies stamp, Collage Paper, Collage Words, Washi Tape, Mini Favourites stencil, Tim Holtz Black Soot Archival ink, Multi Medium Matte (Ranger), gesso (Liquitex), Black  All pencil (Stabilo), thread and dictionary page (Misc.)

While that was drying, I stamped the bird with Black Archival ink on a piece of dictionary paper and fussy cut it out. I added some left over bits of Dina Wakley washi tape to add balance and to cover where I had pressed too firmly with the Scribble Sticks and had left some scribble lines that hadn't dissolved. In trying out the bird placement, I decided it needed some more textural interests so I sewed the branch and leaves outline leaving lots of loose thread to create a nest for the bird and added gesso through a Mini Elements stencil to the background. Now that I was happy with that, I adhered the bird. Lastly, I cut and collaged the Dina collage words quote and splattered it with some of the black Stibilo scribbled on a mat with water to complete it.

One ICAD down, many more to come. :)

Be sure to check out the Simon Says Stamp Monday Challenge DT's Sprays and Splashes inspirational takes on the challenge along with all the participants' creative eye candy here.


TTFN,


Friday, June 19, 2020

Steampunk Blog Hop


***UPDATED July 5th: Bookmark and ATC giveaway is closed.

Winners are Penny -Bookmark & Elle - ATC. Congrats ladies! Please send me your mailing info so I can get these out to each of you.***

***UPDATE June 23rd: Commenting for Blog Hop prizes has ended. Commenting for my bookmark and ATC giveaway is open until Saturday, July 4th at 11:59 PM.***

Welcome, crafty enthusiasts! It's blog hop time with a spectacular array of steampunk creations with sixteen sponsored prizes up for grabs. My contribution to this sojourn is themed Sea, Land, & Air as I join in with a steampunk inspired bookmark and ATC.


The bookmark base is made from water spritzed and crinkled kraft cardstock topped with Stamperia Mechanical Sea World patterned papers including the glossy accent embellished fussy cut seahorse.


Some distressing with Tim Holtz Distress inks, chipboard gears from Creative Embellishments and cut out letters/words from the Mechanical Sea Worlds packaging completes the main part of the "Free to be Me" bookmark in order for it to maintain its functionality as an actual bookmark. Where I had more freedom to add dimensional pieces was with the "ribbon & charm" part that hangs outside of a book.


Supplies: Mechanical Sea World patterned papers (Stamperia), kraft carstock (CTMH), Glossy Accents, Walnut Stain Tim Holtz Distress Ink, Distress Collage Medium (Ranger), mini gear chipboards (Creative Embellishments), Cerith Seashell Stamp, Ancient Anchor Charm (Emerald Creek Craft Supplies), Timber Brown StazOn inks (Tsukineko), Shrink-It (Aleene's), Natural Hemp Cord (Darice), Tim Holtz Idea-ology Jump Rings (Advantus), glass beads (Misc.)

For that, I used hemp cord tied with glassbeads, a shrink plastic seashell stamped with the Emerald Creek Cerith Seashell stamp and an alcohol ink coloured anchor embellishment. I am so pleased with how this came together and that it is perfect for a steampunk enthusiast's use in a practical way.

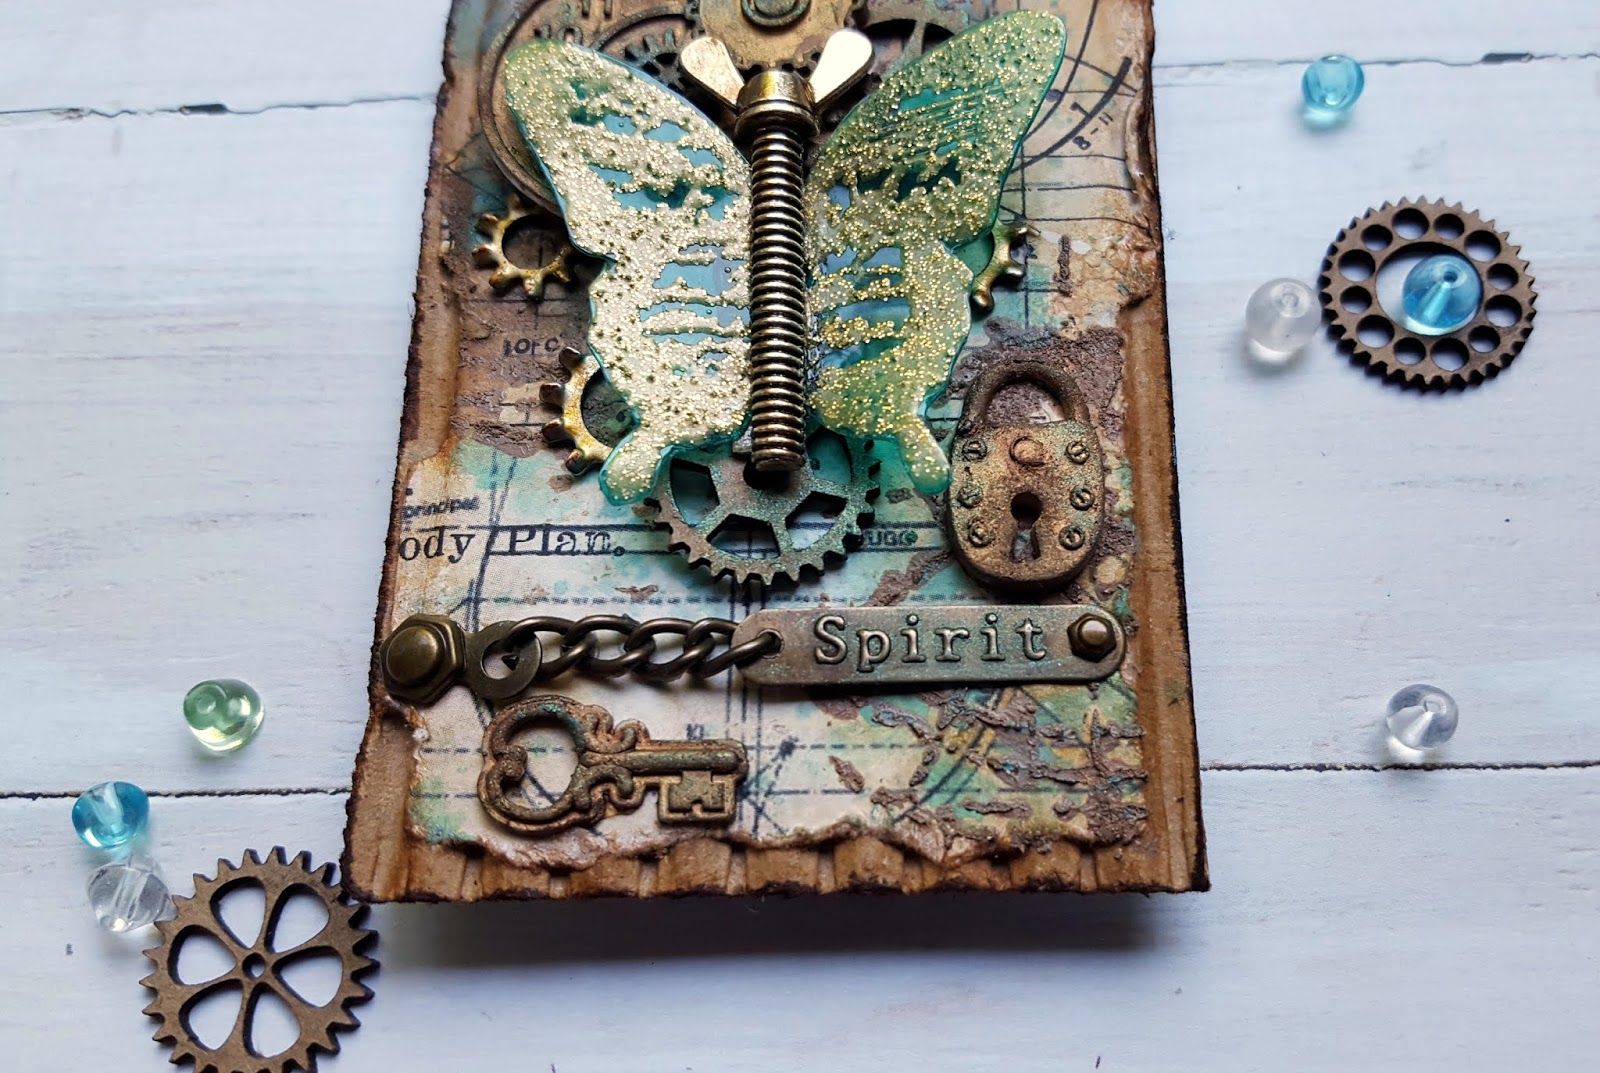
Up next is this little up-cycled gem of an ATC. I like to reuse/repurpose what I can in art pieces and this one incorporates corrugated cardboard and shell plastic packaging as key elements in its design. It was an add-on item to my initial intention of just having the bookmark as a stand alone piece for this hop. As I waited for the hop day I wanted to make something that expressed the current world wide reflection of the status quo situation and came up with this. 


The "Unlock the Spirit of Change" ATC starts with a base piece of corrugated expose cardboard topped with a distressed piece of the Stamperia Mechanical Sea World patterned paper. After splattering it with Broken China Distress ink and Vintage Photo Distress inking the edges, I applied Tim Holtz Grit Paste mixed with Burnt Sienna Finnabair Fluid Acrylics through the Crafter's Workshop Mini Specimens stencil.


Supplies: Mechanical Sea World pattern paper (Stamperia), Mini Specimens stencil (The Crafter's Workshop), Finnabair Burnt Sienna Liquid acrylic, Mermaid Teal acrylic paint, Lucky Emerald Antique Brilliance, Ingvild Blome Stamp-N-Add Butterfly Wings (Prima), Tim Holtz Distress Grit Paste, Distress Collage Medium, Broken China, Vintage Photo and Ground Espresso Distress ink, Patina, Pool and Express Alcohol ink, Gold Mixative, Glossy Accents (Rangers), mini gears chipboard (Creative Embellishments), Mod Podge Industrial molds (Plaid), VersaMark ink (Tsukineko), Vega Gold emboss powder (Emerald Creek), Spirit metal tag (Dollarama), Tim Holtz Ideaology Hex Fasteners (Advantus), metal washer (Home Depot), cardboard and plastic packaging (Misc.)

On top of that is a collection of Creative Embellishments Mini Gears chipboard, Industrial Mod Podge molded gears, lock and key coloured with a combination of alcohol inks and Finnabair paint and wax. The butterfly was created from left over plastic shell packaging coloured with Patina and Pool alcohol inks and then heat embossed stamped with a Prima butterfly using Emerald Creeks Vegas Gold Emboss powder. The butterfly is mechanized with an alcohol ink coloured Prima metal wing screw embellishment hopefully giving the illusion that it is wound to fly as it is set free. There is much symbolism in this piece with elements purposely chosen that marry themselves well to express the message through a steampunk theme.

Now onto the give away part...


As for my blog's giveaway... it is both of these creations. Yes, you can become the owner of one of these crafty creations and yes, I am willing to snail mail them internationally so two lucky people can enjoy them. To be entered into my blog's Sea, Land and Air giveaway draw, you simply have to complete these two steps:


  1. Be a follower of my blog or my IG account here or become a follower of either and 
  2. Leave a comment below on this post stating which you would like to win e.g. ATC, bookmark, or either one.


My blog giveaway ends Saturday, July 4th at 11:59 PM. Please note that this is a different timeline than the Steampunk blog hop sponsored prizes which ends Monday, June 22nd.

As for a chance to win one of the 16 sponsored prizes for our Steampunk Hop - we're proud to say these are small businesses run by artists. Let's show them some love!
1) A Vintage Girl - $20 prize package
2) Angel Dream Crafts - $20 gift certificate (shipping not included)
3) Linda Israel Art - $50 gift certificate (shipping not included)
4) A Matter of Crafts - $20 gift certificate (shipping not included)
5) Expressions Craft - $25 gift certificate (shipping not included)
6) Nellys Artistic Creations - original artwork (see link for examples of her work)
7) Gecko Galz - $25 in digital products
8) Creative Embellishments - $50 (shipping not included)
9) Emerald Creek - $25 gift certificate
10) Electric Pandemonium - choose a $45 original artwork piece (shipping not included)
11) Thompson's Craft Supplies £20 (approx $25) (shipping not included)
12) It's Oddly Appealing - original artwork (see link for examples of her work)
13) The Funkie Junkie Boutique - $25 gift certificate
14) Hobbilicious - £15 (approx $19) (UK shipping free)
15) ITD - prize package worth £25
16) Stamperia - a pizza box prize pack

To have a chance of winning one of the 16 coveted prizes, leave a comment on this post, along with your email address or social media contact (IG, FB, etc) and what country you're from, from now through Monday, June 22nd. Sixteen winners will be picked randomly from all comments left from all of the artist's participating! The winners will be contacted via email/social media so it's important you leave your address/social media contact! Good luck and enjoy the hop!

For your next stop on the Steampunk hop, please head on over to Monica Longard's MonDo Creations.


If you are just beginning the Steampunk Blog Hop with your visit here on my blog, below is the full list of all the inspirational talented makers:
A big thank you goes out to Cathy Frailey (owner of Bleeding Art challenge blog and the coming in September Steampunk Challenge blog) for organizing this hop. Be sure to visit all the hop stops for some fun mixed media steampunk creations and be sure to leave some love!

TTFN,

Saturday, May 30, 2020

Blessed - Magenta


Hello Crafty Friends! Today, I am up on the Magenta blog with my monthly DT post sharing this mixed media card creation. From my last post, you know that I have been playing with a faux plaster/stone floral mixed media technique with a variety of paste bases.


I started by spreading out some Golden Light Molding Paste on a craft mat. Once it was not sticky to the touch, I spritzed the Script and Postmark stamp with water and then pressed it into the paste in a variety of places. Next, I spritzed and pressed the Poppies stamp into the paste.


Once dry, I added watered down black acrylic paint so it would seep into the script and cracks. After letting it set up a minute or two, I removed the excess off the top surface with a baby wipe. Then, I painted the poppies with Dina Wakley Scribble Sticks using a waterbrush. Once dry, I matted it on a 4" x 6" black card base with a layer of cereal box board to give it a little dimension. Lastly, I added a slightly distressed sticker sentiment.


Supplies: Script and Post and Poppies stamps (Magenta), Light Molding Paste (Golden), black acrylic paint (DecoArts), Dina Wakley Sedona and Olive Scribble Sticks (Ranger), Tim Holtz Big Chat sticker (Advantus), black cardstock (Bazzill), white cardstock card base (Staples)

Once again, I am pleased with how this one turned out. I have two more faux plaster/stone floral paste bases that I have yet to play with. Looking forward to trying them out too.


TTFN,


*****

Magenta products used:

Poppies

Friday, May 15, 2020

Bleeding Art May Challenge


Hi crafty friends! I have to start out with a Yeah for mid May! I have been waiting for this day for two months. Today, is my first official post as part of the Bleeding Art Challenge Blog Design Team. We host a monthly mixed media Anything Goes Challenge which draws such a variety of styles from around the world. My inspiration creation for this month's challenge is a faux plaster/stone floral mixed media canvas.


I started by creating a taped off 5 1/2" x 4 1/4" area on a craft mat and then I spread Ranger Texture Paste with a spatula in the space. I let it set up enough that if I could gently touch the surface and it would not lift or move the paste. I then spritzed the Magenta Doodle Flower stamp with water and then pressed the stamp into the paste near the top right section and repeated the process for the bottom left part to create the floral focal point. Next, I took the Script and Postmark stamp and spritzed it with water before pressing it into the surface in multiple places to add dimensional texture interest.


Once it was dry, I coloured it with Tim Holtz Distress Ink products. I spritzed the whole piece with Vintage Photo Distress Spray Stain and then blotted up all the colour on the panel surface leaving it to well in the script, flower outline and post mark impressions. Next, I spritzed the whole thing with Antique Linen Distress Spray Stain. Once it was dry, the Antique Linen was too light so I used a small brush and added some Distress Vintage Collage Medium which also worked to seal the colour. Then, I coloured the flower using Wild Honey Distress Ink for the flower petals and Peeled Paint for the stems and leaves. I decided at that point the the panel background colour didn't provide enough contrast to the flower's colours so I used my fingers to dab on little bits of gesso being careful to stay on the flat surface and not fill any of the cracks. 


While the floral panel was drying, I turned my attention to creating the background base. I covered a 5" x 7" dollar store canvas with black gesso. Once that was dry to touch, I adhered the black tissue paper with collage medium, crinkling and scrunching the tissue as I went along covering the entire canvas. Once the tissue was glued down I then added a coat of the medium on top and set it aside to dry. Once it was dry, it has a bit of a gloss sheen but only in some sections that I wanted to get rid of as well as I wanted the crinkled tissue texture to show more so I simply ran my emboss buddy across it depositing some powder over the surface that did the trick.


Now, I was ready to it all together. I adhered the panel with two layers of cereal box board beneath it to pop it up a bit onto the canvas. Next, I created the bloom word strip on my computer using a type writer font for the text in white and word highlight in black and printed it onto cardstock. After cutting it out, I adhered it with Multi Medium Matte to the panel to finish it off.


There you have it... my finished mixed media seasonal panel. I love the vintage antiqued faux stone/plaster cast look that I achieved. I am thinking I will do a series of these and then hang them together in as a collage.


Supplies: Flower and Script and Postmark stamps (Magenta), Texture Paste, Tim Holtz Antique Linen and Vintage Photo Distress Spray Stains, Wild Honey and Peeled Paint Distress Inks, Tim Holtz Distress Collage Medium and Vintage Collage Medium, Multi Medium Matte (Ranger), gesso (Liquitex), canvas (Dollarama), black tissue (misc.)

Head on over to the Bleeding Art Challenge Blog here. As you will see from the design team inspiration, there is an eclectic mix of projects and styles. Such ingenuity and creativity all packed together. The challenge starts mid month and you have a month's time to enter.

Happy Crafting!

TTFN,